
| 일 | 월 | 화 | 수 | 목 | 금 | 토 |
|---|---|---|---|---|---|---|
| 1 | 2 | 3 | 4 | 5 | ||
| 6 | 7 | 8 | 9 | 10 | 11 | 12 |
| 13 | 14 | 15 | 16 | 17 | 18 | 19 |
| 20 | 21 | 22 | 23 | 24 | 25 | 26 |
| 27 | 28 | 29 | 30 |
- MySQL
- web
- erc
- geth
- server
- ethers
- erc721
- 스마트 컨트랙트
- Docker
- truffle
- 네트워크
- 트랜잭션
- Ethereum
- Programming
- 블록체인
- ERC20
- web3
- Python
- 제어의역전
- JavaScript
- NFT
- blockchain
- github
- ERC165
- solidity
- 이더리움
- web3.js
- git
- 솔리디티
- tcp
- Today
- Total
멍개의 연구소
[ethereum] Geth를 이용하여 Clique(POA) 기반 private network 구축하기 본문
Geth를 이용하여 Ethash(POW) 기반 private network 구축하는 방법을 알아보겠습니다.
Geth는 POW(Ethash), POA(Clique), POS(Caspre)를 선택적으로 운용가능합니다.
지난번에 정리한 POW(Ethash) 기반으로 작성한 글을 참고하면 어렵지 않게 진행할 수 있습니다.
2022.08.27 - [블록체인] - [ethereum] Geth를 이용하여 Ethash 기반 private network 구축하기
[ethereum] Geth를 이용하여 Ethash 기반 private network 구축하기
Geth를 이용하여 Ethash(POW) 기반 private network 구축하는 방법을 알아보겠습니다. Geth는 POW(Ethash), POA(Clique), POS(Caspre)를 선택적으로 운용가능합니다. 여기선 개념적인 내용보다 방법론적인..
meongae.tistory.com
여기선 개념적인 내용보다 방법론적인 내용을 주로 다룹니다.
※ 진행순서
1. allocation, mine base 지갑주소 생성
2. 첫 번째 노드 구동
3. 두 번째 노드 구동
4. 네트워크 연결
5. block, transaction broadcast 동작 테스트
1. 지갑주소 생성
지갑주소를 생성하는 이유는 초기 이더를 할당하고 마이닝할 때 리워드(보상)을 가져갈 주소를 미리 설정해주기 위함입니다.
참고로 POA는 POW와 다르게 컴퓨팅 파워가 아닌 라운드 로빈을 사용합니다.
$ geth --datadir [경로] account newgeth를 이용할 땐 반드시 어느경로에 저장할지 지정해줘야 합니다. 그렇지 않을경우 지정된 기본경로를 사용합니다.
· 노드1에서 지갑생성
$ geth --datadir $PWD account new# node1 디렉터리에서 수행
$ geth --datadir $PWD account new
INFO [02-19|10:04:28.072] Maximum peer count ETH=50 LES=0 total=50
Your new account is locked with a password. Please give a password. Do not forget this password.
Password:
Repeat password:
Your new key was generated
Public address of the key: 0x5143155F92cb9d6D3a46c7d1F4413B44C8Fb3f2d
Path of the secret key file: /Users/bagjeongtae/Desktop/POA_node1/keystore/UTC--2021-02-19T01-04-29.450280000Z--5143155f92cb9d6d3a46c7d1f4413b44c8fb3f2d
- You can share your public address with anyone. Others need it to interact with you.
- You must NEVER share the secret key with anyone! The key controls access to your funds!
- You must BACKUP your key file! Without the key, it's impossible to access account funds!
- You must REMEMBER your password! Without the password, it's impossible to decrypt the key!
$ geth --datadir $PWD account new
INFO [02-19|10:04:31.932] Maximum peer count ETH=50 LES=0 total=50
Your new account is locked with a password. Please give a password. Do not forget this password.
Password:
Repeat password:
Your new key was generated
Public address of the key: 0x852159cDFdB2Ac32807d57782aB0217B3024fAfb
Path of the secret key file: /Users/bagjeongtae/Desktop/POA_node1/keystore/UTC--2021-02-19T01-04-33.140369000Z--852159cdfdb2ac32807d57782ab0217b3024fafb
- You can share your public address with anyone. Others need it to interact with you.
- You must NEVER share the secret key with anyone! The key controls access to your funds!
- You must BACKUP your key file! Without the key, it's impossible to access account funds!
- You must REMEMBER your password! Without the password, it's impossible to decrypt the key!

2개의 계정을 생성해주었습니다.
· 노드2에서 지갑생성
여기선 3개의 주소를 라운드 로빈을 하기위해 계정 하나를 더 만들어 줄건데 한개의 계정은 두 번째 노드 경로에 추가해주도록 하겠습니다. 참고로 계정은 어디에있던지 상관없습니다.
# node2 디렉터리에서 수행
$ geth --datadir $PWD account new

INFO [02-19|10:08:08.105] Maximum peer count                       ETH=50 LES=0 total=50
Your new account is locked with a password. Please give a password. Do not forget this password.
Password:
Repeat password:

Your new key was generated

Public address of the key:   0x444BBC8CB8aa094A76F77862d661146E0C9d6339
Path of the secret key file: /Users/bagjeongtae/Desktop/POA_node2/keystore/UTC--2021-02-19T01-08-09.485488000Z--444bbc8cb8aa094a76f77862d661146e0c9d6339

- You can share your public address with anyone. Others need it to interact with you.
- You must NEVER share the secret key with anyone! The key controls access to your funds!
- You must BACKUP your key file! Without the key, it's impossible to access account funds!
- You must REMEMBER your password! Without the password, it's impossible to decrypt the key!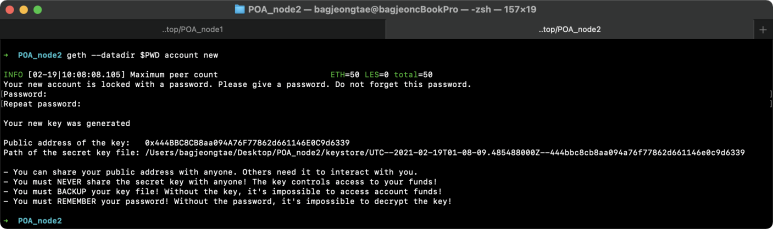

노드1: 0x5143155F92cb9d6D3a46c7d1F4413B44C8Fb3f2d
노드1: 0x852159cDFdB2Ac32807d57782aB0217B3024fAfb
노드2: 0x444BBC8CB8aa094A76F77862d661146E0C9d6339
2. 첫 번째 노드 구동
노드를 구동하기 전에 제네시스 블록을 생성하기 위해 제네시스 블록을 만들기 위한 파일(genesis.json)을 만들어줍니다.
파일 템플릿은 POW(Ethash)와 비슷합니다.
· genesis.json 생성
{
  "config": {
    "chainId": 12345,
    "homesteadBlock": 0,
    "eip150Block": 0,
    "eip155Block": 0,
    "eip158Block": 0,
    "byzantiumBlock": 0,
    "clique": {
      "period": 5,
      "epoch": 30000
    }
  },
  "nonce": "0x0",
  "timestamp": "0x5a722c92",
  "extraData": "0x00000000000000000000000000000000000000000000000000000000000000005143155F92cb9d6D3a46c7d1F4413B44C8Fb3f2d444BBC8CB8aa094A76F77862d661146E0C9d63390000000000000000000000000000000000000000000000000000000000000000000000000000000000000000000000000000000000000000000000000000000000",
  "gasLimit": "0x59A5380",
  "difficulty": "0x1",
  "mixHash": "0x0000000000000000000000000000000000000000000000000000000000000000",
  "coinbase": "0x0000000000000000000000000000000000000000",
  "alloc": {
    "5143155F92cb9d6D3a46c7d1F4413B44C8Fb3f2d" : {
      "balance": "1500000000000000000000"
    }
   },
  "number": "0x0",
  "gasUsed": "0x0",
  "parentHash": "0x0000000000000000000000000000000000000000000000000000000000000000"
}
여기서 라운드 로빈 시킬 계정을 extraData에 포함시키면 됩니다.
포함시키는 방법은 앞에서 생성한 지갑의 prefix로 붙어있는 0x를 제외하고 이어서 붙여주면 됩니다.
5143155F92cb9d6D3a46c7d1F4413B44C8Fb3f2d852159cDFdB2Ac32807d57782aB0217B3024fAfb444BBC8CB8aa094A76F77862d661146E0C9d6339[라운드 로빈 계정] 부분에 앞의 문자열로 대체합니다.
{
  "config": {
    "chainId": 12345,
    "homesteadBlock": 0,
    "eip150Block": 0,
    "eip155Block": 0,
    "eip158Block": 0,
    "byzantiumBlock": 0,
    "clique": {
      "period": 5,
      "epoch": 30000
    }
  },
  "nonce": "0x0",
  "timestamp": "0x5a722c92",
  "extraData": "0x00000000000000000000000000000000000000000000000000000000000000005143155F92cb9d6D3a46c7d1F4413B44C8Fb3f2d852159cDFdB2Ac32807d57782aB0217B3024fAfb444BBC8CB8aa094A76F77862d661146E0C9d63390000000000000000000000000000000000000000000000000000000000000000000000000000000000000000000000000000000000000000000000000000000000",
  "gasLimit": "0x59A5380",
  "difficulty": "0x1",
  "mixHash": "0x0000000000000000000000000000000000000000000000000000000000000000",
  "coinbase": "0x0000000000000000000000000000000000000000",
  "alloc": {  },
  "number": "0x0",
  "gasUsed": "0x0",
  "parentHash": "0x0000000000000000000000000000000000000000000000000000000000000000"
}
clique.period는 트랜잭션이 발생하지 않을때 블록생성 주기입니다.
· genesis.json 초기화
$ geth --datadir [경로] init [제네시스파일 경로]$ geth --datadir $PWD init genesis.json
INFO [02-19|10:24:39.001] Maximum peer count ETH=50 LES=0 total=50
INFO [02-19|10:24:39.021] Set global gas cap cap=25000000
INFO [02-19|10:24:39.021] Allocated cache and file handles database=/Users/bagjeongtae/Desktop/POA_node1/geth/chaindata cache=16.00MiB handles=16
INFO [02-19|10:24:39.099] Writing custom genesis block
INFO [02-19|10:24:39.100] Persisted trie from memory database nodes=0 size=0.00B time="20.641µs" gcnodes=0 gcsize=0.00B gctime=0s livenodes=1 livesize=0.00B
INFO [02-19|10:24:39.101] Successfully wrote genesis state database=chaindata hash="8a08d7…b5ee63"
INFO [02-19|10:24:39.101] Allocated cache and file handles database=/Users/bagjeongtae/Desktop/POA_node1/geth/lightchaindata cache=16.00MiB handles=16
INFO [02-19|10:24:39.194] Writing custom genesis block
INFO [02-19|10:24:39.194] Persisted trie from memory database nodes=0 size=0.00B time="4.418µs" gcnodes=0 gcsize=0.00B gctime=0s livenodes=1 livesize=0.00B
INFO [02-19|10:24:39.195] Successfully wrote genesis state database=lightchaindata hash="8a08d7…b5ee63"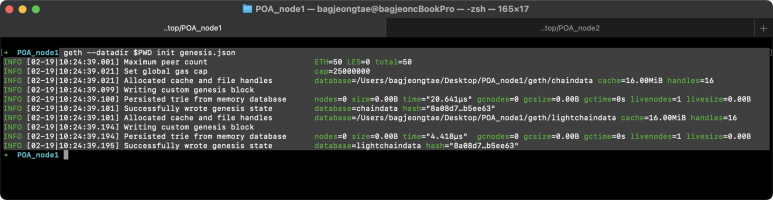
여기까지 작업을 정상적으로 마쳤다면 다음과 같이 결과를 얻습니다.

· 노드실행
$ geth \
--datadir $PWD \
--syncmode 'full' \
--allow-insecure-unlock \
--networkid 12345 \
--maxpeers 3 \
--http \
--http.port 8545 \
--http.addr "0.0.0.0" \
--http.corsdomain "*" \
--http.api "admin,eth,debug,miner,net,txpool,personal,web3" \
--ws \
--ws.port 3334 \
--ws.api eth,net,web3 \
--port 30303 \
--gasprice 21000 \
--nodiscover \
--unlock '0x5143155f92cb9d6d3a46c7d1f4413b44c8fb3f2d' \
--password password.txt \
console
unlock은 해당 노드에서 라운드 로빈에 등록된 extraData에서 하나 또는 컴마로 구분하여 지갑을 나열합니다.
--password 옵션으로 전달하는 파일은 --unlock에 등록한 계정들의 키스토어파일 비밀번호를 작성합니다. 만약 --unlock에 컴마로 여러 지갑을 나열했다면 엔터로 구분하여 각각의 비밀번호를 작성합니다.

p추후 노드 연결을 위해 enode를 잘 기억해둡시다.
enode://6e7cdfbb3ca0194187b4ce9acbd3db77f603cf197881ca3ae8598e94ce5c679f0fda5945995b87f666d090467bf3706a584856ce5e86453fff27be34669eb3d6@127.0.0.1:30303?discport=03. 두 번째 노드 구동
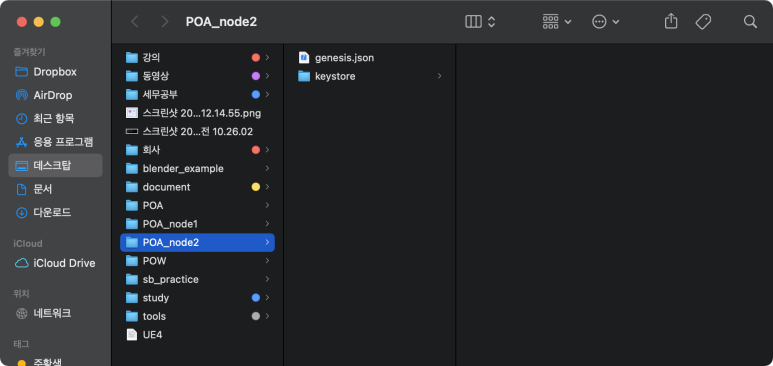
· genesis.json 파일 생성
첫 번째 노드 구동 시 사용하던 genesis.json을 가져옵니다.
· 제네시스 블록 초기화
$  geth --datadir $PWD init genesis.json

INFO [02-19|10:29:12.788] Maximum peer count                       ETH=50 LES=0 total=50
INFO [02-19|10:29:12.805] Set global gas cap                       cap=25000000
INFO [02-19|10:29:12.805] Allocated cache and file handles         database=/Users/bagjeongtae/Desktop/POA_node2/geth/chaindata cache=16.00MiB handles=16
INFO [02-19|10:29:12.888] Writing custom genesis block
INFO [02-19|10:29:12.889] Persisted trie from memory database      nodes=0 size=0.00B time="19.063µs" gcnodes=0 gcsize=0.00B gctime=0s livenodes=1 livesize=0.00B
INFO [02-19|10:29:12.889] Successfully wrote genesis state         database=chaindata hash="8a08d7…b5ee63"
INFO [02-19|10:29:12.889] Allocated cache and file handles         database=/Users/bagjeongtae/Desktop/POA_node2/geth/lightchaindata cache=16.00MiB handles=16
INFO [02-19|10:29:12.963] Writing custom genesis block
INFO [02-19|10:29:12.963] Persisted trie from memory database      nodes=0 size=0.00B time="3.692µs"  gcnodes=0 gcsize=0.00B gctime=0s livenodes=1 livesize=0.00B
INFO [02-19|10:29:12.964] Successfully wrote genesis state         database=lightchaindata hash="8a08d7…b5ee63"
첫 번째 노드에서 제네시스 블록을 생성할 때 사용한 명령어와 동일합니다. 다만 해당 명령어를 수행하는 위치가 다릅니다.

제네시스 블록으로 생성된 데이터의 위치가 다른것을 확인할 수 있습니다.
· 노드실행
$ geth \
--datadir $PWD \
--syncmode 'full' \
--allow-insecure-unlock \
--networkid 12345 \
--maxpeers 3 \
--http \
--http.port 8546 \
--http.addr "0.0.0.0" \
--http.corsdomain "*" \
--http.api "admin,eth,debug,miner,net,txpool,personal,web3" \
--ws \
--ws.port 3335 \
--ws.api eth,net,web3 \
--port 30304 \
--gasprice 21000 \
--nodiscover \
--unlock '0x444bbc8cb8aa094a76f77862d661146e0c9d6339' \
--password password.txt \
console
두 번째 노드를 실행할 때 중요한 건 이미 실행중인 첫 번째 노드에서 사용중인 포트를 곂치지 않게 해야합니다. 다음 3개를 수정합니다.
--http.port
--ws.port
--port
첫 번째 노드와 마찬가지로 unlock은 해당 노드에서 라운드 로빈에 등록된 extraData에서 하나 또는 컴마로 구분하여 지갑을 나열합니다.
--password 옵션으로 전달하는 파일은 --unlock에 등록한 계정들의 키스토어파일 비밀번호를 작성합니다. 만약 --unlock에 컴마로 여러 지갑을 나열했다면 엔터로 구분하여 각각의 비밀번호를 작성합니다.
p
enode://8938590dd2a17a48d23025d6e7cbb13549ca9f75374651665e38adf45cbf9c3ad4478a804bcfdf59c12f34f005d2e6842e43ceadbb680e52069dd9de2879d060@127.0.0.1:30304?discport=04. 노드연결
노드1: enode://6e7cdfbb3ca0194187b4ce9acbd3db77f603cf197881ca3ae8598e94ce5c679f0fda5945995b87f666d090467bf3706a584856ce5e86453fff27be34669eb3d6@127.0.0.1:30303?discport=0
노드2: enode://8938590dd2a17a48d23025d6e7cbb13549ca9f75374651665e38adf45cbf9c3ad4478a804bcfdf59c12f34f005d2e6842e43ceadbb680e52069dd9de2879d060@127.0.0.1:30304?discport=0
노드1에서 admin.addPeer(노드2 enode) 또는 노드2에서 admin.addPeer(노드1 enode)를 호출합니다. 저는 전자의 방법을 택하겠습니다.
> admin.addPeer("enode://8938590dd2a17a48d23025d6e7cbb13549ca9f75374651665e38adf45cbf9c3ad4478a804bcfdf59c12f34f005d2e6842e43ceadbb680e52069dd9de2879d060@127.0.0.1:30304?discport=0")
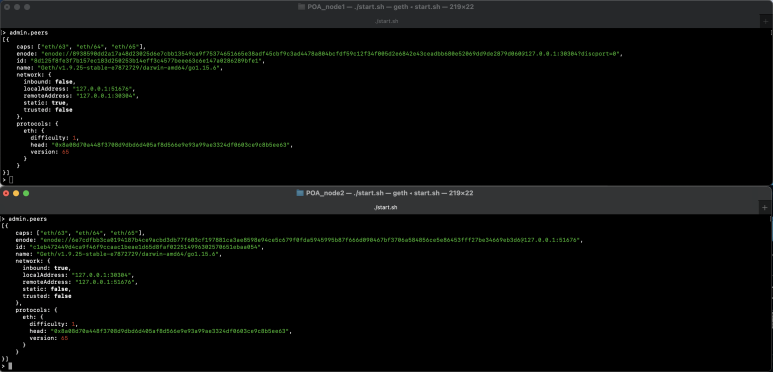
> true노드 1, 2에서 admin.peers로 각 노드에서 연결하고 있는 노드를 조회할 수 있습니다.
> admin.peers
[{
    caps: ["eth/63", "eth/64", "eth/65"],
    enode: "enode://8938590dd2a17a48d23025d6e7cbb13549ca9f75374651665e38adf45cbf9c3ad4478a804bcfdf59c12f34f005d2e6842e43ceadbb680e52069dd9de2879d060@127.0.0.1:30304?discport=0",
    id: "8d125f8fe3f7b157ec183d250253b14eff3c4577beee63c6e147a0286289bfe1",
    name: "Geth/v1.9.25-stable-e7872729/darwin-amd64/go1.15.6",
    network: {
      inbound: false,
      localAddress: "127.0.0.1:51676",
      remoteAddress: "127.0.0.1:30304",
      static: true,
      trusted: false
    },
    protocols: {
      eth: {
        difficulty: 1,
        head: "0x8a08d70a448f3708d9dbd6d405af8d566e9e93a99ae3324df0603ce9c8b5ee63",
        version: 65
      }
    }
}]

> net
{
  listening: true,
  peerCount: 1,
  version: "10",
  getListening: function(callback),
  getPeerCount: function(callback),
  getVersion: function(callback)
}
> admin.peers
[{
caps: ["eth/63", "eth/64", "eth/65"],
enode: "enode://6e7cdfbb3ca0194187b4ce9acbd3db77f603cf197881ca3ae8598e94ce5c679f0fda5945995b87f666d090467bf3706a584856ce5e86453fff27be34669eb3d6@127.0.0.1:51676",
id: "c1eb472449d4ca9f46f9ccaac1beae1d65d8faf022514996302570651ebaa054",
name: "Geth/v1.9.25-stable-e7872729/darwin-amd64/go1.15.6",
network: {
inbound: true,
localAddress: "127.0.0.1:30304",
remoteAddress: "127.0.0.1:51676",
static: false,
trusted: false
},
protocols: {
eth: {
difficulty: 1,
head: "0x8a08d70a448f3708d9dbd6d405af8d566e9e93a99ae3324df0603ce9c8b5ee63",
version: 65
}
}
}]
> net
{
listening: true,
peerCount: 1,
version: "10",
getListening: function(callback),
getPeerCount: function(callback),
getVersion: function(callback)
}
>
5. 동작 테스트
POA 기반에선 miner.start()를 실행하면 컴퓨팅 리소스가 아니라 트랜잭션 발생시 extraData에 등록한 지갑 순서대로 블록생성을 합니다. 이 방법을 라운드로빈이라고 부릅니다.
· 트랜잭션 발생
> eth.sendTransaction({from: eth.accounts[0], to: eth.accounts[1], value: 12321})

INFO [02-19|11:40:47.383] Setting new local account                address=0x5143155F92cb9d6D3a46c7d1F4413B44C8Fb3f2d
INFO [02-19|11:40:47.383] Submitted transaction                    fullhash=0xf4c848358401bf56f0f28fc0831558bd520f8c09d1d80c2172bed25e32cb7061 recipient=0x852159cDFdB2Ac32807d57782aB0217B3024fAfb
"0xf4c848358401bf56f0f28fc0831558bd520f8c09d1d80c2172bed25e32cb7061"
· POA 구동시작
각 노드에서 miner.start()를 해야 각 노드에서 POA를 위해 등록한 주소를 블록생산에 참가 시킬 수 있습니다. 첫 번째, 두 번째 노드에서 POA 구동을 해줍니다.
한가지 중요한 점은 extraData에 포함한 계정 갯수(POA에 참가한 지갑)가 N개일 때 (N/2 +1)개 만큼 구동되야 정상적으로 POA를 구동합니다.
역기선 2개를 등록했기 때문에 2/2 + 1 = 2개가 구동되어야 동작하게 됩니다.
INFO [02-19|12:01:25.005] 🔨 mined potential block                  number=193 hash="229f58…6d0ce6"
INFO [02-19|12:01:25.005] Commit new mining work                   number=194 sealhash="d9511f…87a806" uncles=0 txs=0 gas=0     fees=0         elapsed="269.905µs"
블록을 생성할 때 로그입니다.
INFO [02-19|12:01:50.008] Imported new chain segment blocks=1 txs=0 mgas=0.000 elapsed="184.608µs" mgasps=0.000 number=198 hash="84dc69…708e32" dirty=6.59KiB블록을 전달받을 때 로그입니다.
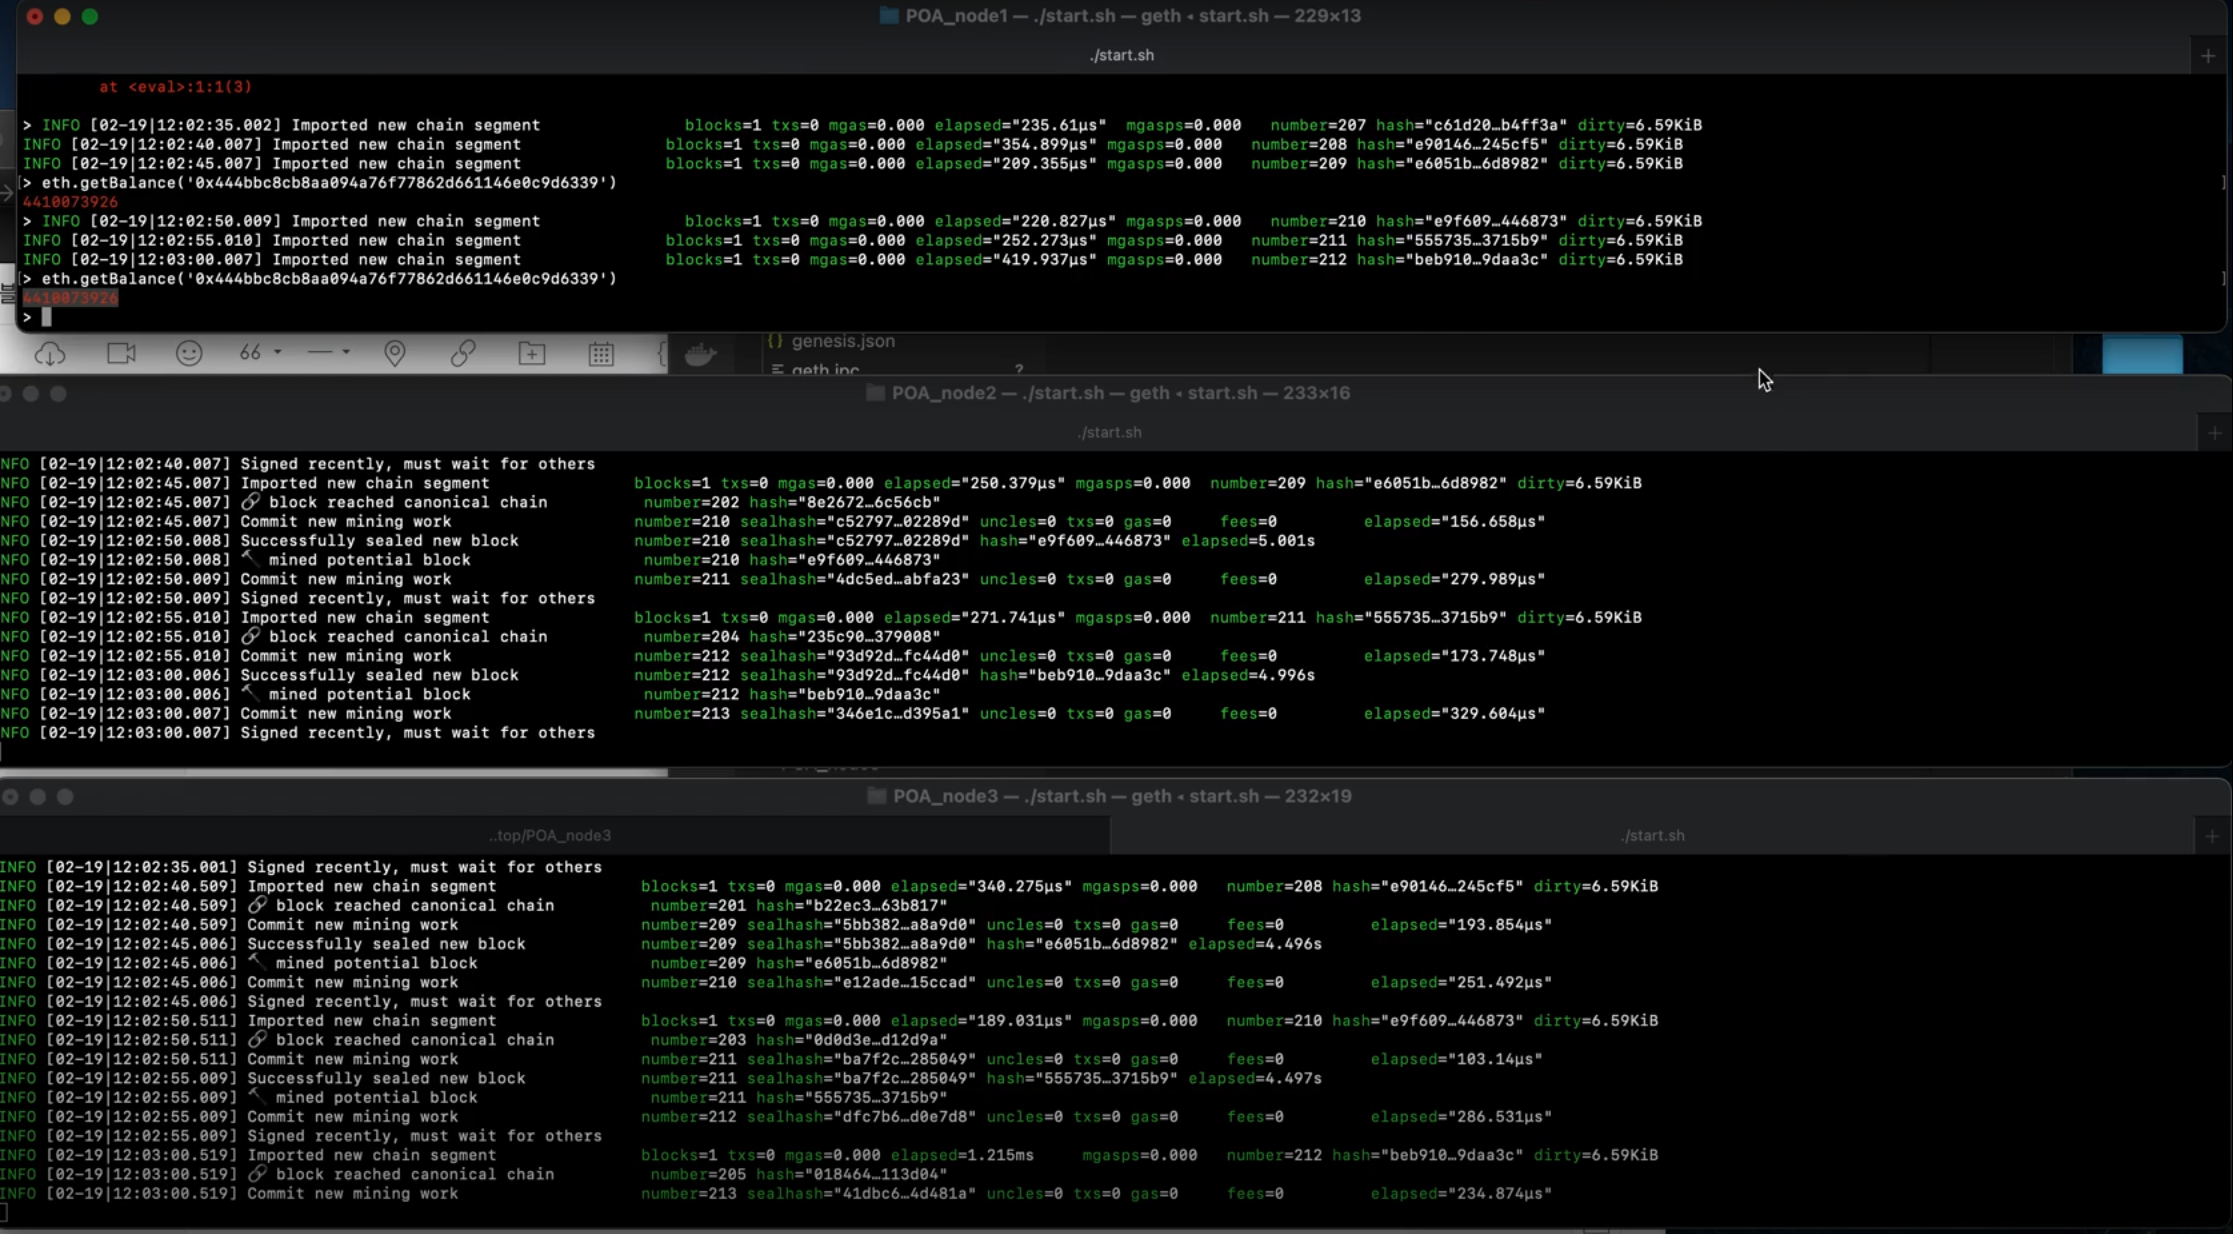
마이닝을 하게 되면 [그림 1.1]에서 가장위의 노드는 unlock과 password를 전달하지 않는 노드입니다. 즉 블록생성을 하지 않고 아래 두 노드가 unlock과 password를 전달하여 블록 생성을 하는 노드입니다. 첫 번째 노드에서 트랜잭션을 발생하면 2, 3번째 노드가 트랜잭션을 전달받아 순차적으로 블록을 생성합니다.
일반적으로 private 네트워크를 운용할 땐 POW보단 POA를 이용하는 방법을 권장합니다. 그 이유는 POW에 비해 POA는 컴퓨터 리소스를 거의 사용하지 않기 때문에 훨씬 안정적으로 운용할 수 있습니다.
이번시간엔 Geth를 이용하여 POA 기반의 private network를 구축하는 방법을 알아보았습니다.
다음 시간엔 지난번에 구축한 POW 환경과 여기서 만든 POA 환경의 private 네트워크망에서 노드 모니터링을 연동해보도록 하겠습니다.
'블록체인' 카테고리의 다른 글
| [ethereum] ERC721을 이용한 NFT 만들기 - 1편 (0) | 2022.08.28 |
|---|---|
| [ethereum] 이더리움 네트워크 모니터링 시스템 구축 (0) | 2022.08.28 |
| [ethereum] Geth를 이용하여 Ethash 기반 private network 구축하기 (0) | 2022.08.27 |
| [ethereum] mnemonic 생성, privatekey 복구와 계층적 구조의 원리 (0) | 2022.08.27 |
| [ethereum] privatekey를 이용하여 address 복구, transaction 발생 (0) | 2022.08.27 |


