
| 일 | 월 | 화 | 수 | 목 | 금 | 토 |
|---|---|---|---|---|---|---|
| 1 | 2 | 3 | 4 | 5 | 6 | |
| 7 | 8 | 9 | 10 | 11 | 12 | 13 |
| 14 | 15 | 16 | 17 | 18 | 19 | 20 |
| 21 | 22 | 23 | 24 | 25 | 26 | 27 |
| 28 | 29 | 30 | 31 |
- 블록체인
- 제어의역전
- github
- erc721
- ERC20
- web3
- Programming
- Ethereum
- ERC165
- 솔리디티
- 스마트 컨트랙트
- Python
- tcp
- blockchain
- git
- truffle
- 트랜잭션
- ethers
- solidity
- geth
- Docker
- web3.js
- erc
- web
- server
- MySQL
- NFT
- JavaScript
- 이더리움
- 네트워크
- Today
- Total
멍개의 연구소
[ethereum] Geth를 이용하여 Ethash 기반 private network 구축하기 본문
Geth를 이용하여 Ethash(POW) 기반 private network 구축하는 방법을 알아보겠습니다.
Geth는 POW(Ethash), POA(Clique), POS(Caspre)를 선택적으로 운용가능합니다.
여기선 개념적인 내용보다 방법론적인 내용을 주로 다룹니다.
● GETH 다운로드
해당 링크에 접속하면 OS별로 GETH 실행프로그램을 설치할 수 있습니다.

private 네트워크 구축을 위에 필요한 준비는 다음과 같습니다.
1. allocation, mine base 지갑주소 생성
2. 첫 번째 노드 생성
3. 두 번째 노드 생성
4. 네트워크 연결
5. block, transaction broadcast 동작 테스트
1. 지갑주소 생성
가장먼저, 지갑주소를 생성해주는 이유는 초기에 이더를 할당하고 마이닝할 때 리워드(보상)을 가져갈 주소를 미리 설정해주기 위함입니다.
$ geth --datadir [경로] account new항상 geth 또는 parity를 이용할 땐 어느 디렉터리를 기준으로 명령어를 수행할 지 반드시 전달해야 합니다.
$ geth --datadir $PWD account new

INFO [02-16|21:22:15.157] Maximum peer count                       ETH=50 LES=0 total=50
Your new account is locked with a password. Please give a password. Do not forget this password.
Password: 패스워드 입력
Repeat password: 패스워드 입력

Your new key was generated

Public address of the key:   0x04dEb80cc89c42D8148312CFC16E1579E4aF7291
Path of the secret key file: /Users/bagjeongtae/Desktop/node1/keystore/UTC--2021-02-16T12-22-16.603245000Z--04deb80cc89c42d8148312cfc16e1579e4af7291

- You can share your public address with anyone. Others need it to interact with you.
- You must NEVER share the secret key with anyone! The key controls access to your funds!
- You must BACKUP your key file! Without the key, it's impossible to access account funds!
- You must REMEMBER your password! Without the password, it's impossible to decrypt the key!
$PWD는 현재 터미널이 가리키고 있는 위치를 의미하며 비밀번호를 입력하라고 뜹니다. 해당 비밀번호는 private key를 keystore로 변환하기 위해 사용됩니다.

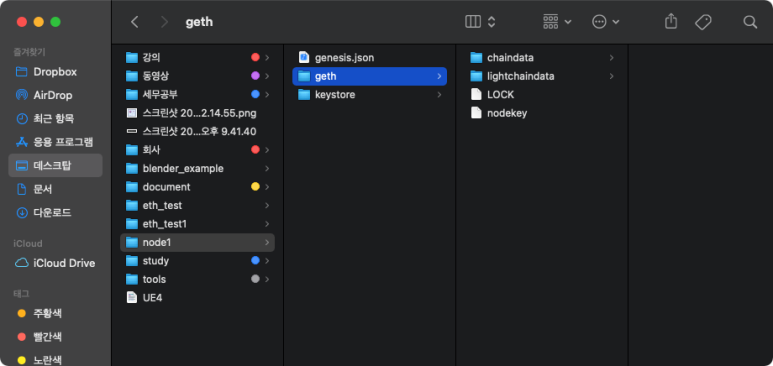
$PWD는 node1 디렉터리를 가리키고 있으며 디렉터리 아래에 private key와 비밀번호를 결합하여 만들어진 keystore 파일을 보관합니다.
$ geth --datadir $PWD account new

INFO [02-16|21:24:27.530] Maximum peer count                       ETH=50 LES=0 total=50
Your new account is locked with a password. Please give a password. Do not forget this password.
Password:
Repeat password:

Your new key was generated

Public address of the key:   0x56F11a78100226558194655c0eAbf64F9627181D
Path of the secret key file: /Users/bagjeongtae/Desktop/node1/keystore/UTC--2021-02-16T12-24-28.547579000Z--56f11a78100226558194655c0eabf64f9627181d

- You can share your public address with anyone. Others need it to interact with you.
- You must NEVER share the secret key with anyone! The key controls access to your funds!
- You must BACKUP your key file! Without the key, it's impossible to access account funds!
- You must REMEMBER your password! Without the password, it's impossible to decrypt the key!
이렇게해서 만들어진 주소는 다음과 같습니다.
0x04dEb80cc89c42D8148312CFC16E1579E4aF7291
0x56F11a78100226558194655c0eAbf64F9627181D
혹시 keystore 파일에 대해서 궁금하신 분은 다음 링크를 통해 확인해보세요.
2022.08.27 - [블록체인] - [ethereum] keystore 파일에 대해서
2. 첫 번째 노드 생성
첫 번째 과정은 스킵하고 넘어갈 수 있습니다.
· genesis 블록 정의
genesis 블록을 만들기 위해 정보를 정의해줘야 합니다. 기본폼은 다음과 같습니다.
또한 가독성을 위해 genesis.json이라고 파일을 만들어 줍니다.
{
  "config": {
    "chainId": 10,
    "homesteadBlock": 0,
    "eip150Block": 0,
    "eip155Block": 0,
    "eip158Block": 0,
    "byzantiumBlock": 0,
    "constantinopleBlock": 0,
    "petersburgBlock": 0,
    "istanbulBlock": 0
  },
  "coinbase"   : "0x0",
  "nonce": "0x0000000000000033",
  "timestamp": "0x0x177AACF3671",
  "parentHash": "0x0000000000000000000000000000000000000000000000000000000000000000",
  "gasLimit": "0x8000000",
  "difficulty": "0x100",
  "mixhash": "0x0000000000000000000000000000000000000000000000000000000000000000",
  "alloc": {}
}
· config
해당 부분은 geth의 버전등을 표현합니다. 해당 정보가 잘못되면 추후에 노드간 연결 및 broadcast가 원할히 진행되지 않거나 transaction이 정상적으로 발생하지 않을 수 있습니다. 항상 사용하고 있는 geth 및 parity 같은 클라이언트 프로그램의 버전에 맞춰서 작성해야 합니다.
여기서 사용한 geth 버전은 다음과 같습니다.
1.9.25-stable-e7872729
· coinbase
마이닝 했을 때 보상받을 지갑주소 .해당값은 추후에 바꿀 수 있습니다.
하지만 해당값을 입력할 땐 prefix로 0x를 반드시 붙여줘야 합니다.
· nonce
POW 알고리즘에 사용하는 파라미터 초기설정 입니다. 알고리즘이 동작하면서 해당값을 바뀌게 됩니다. 크게 신경쓰지 않아도 됩니다.
· timestamp
첫 번째 블록이 만들어진 시간입니다. 당연히 timestamp의 16진수로 변환된 값을 넣어줍니다.
· parantHash
이전블록 해쉬값인데 첫 번째 블록의 이전 블록은 없기 때문에 0x0으로 작성합니다.
· gasLimit
말 그대로 해당 노드에서 최대로 처리할 수 있는 gas 입니다. gas는 연료의 개념으로 이더 전송의 기본 가스 소모량은 21000이며, 스마트컨트랙트는 실행된 코드에 따라 달라지게 됩니다.
· difficulty
nonce와 마찬가지로 POW 알고리즘 동작에 사용되는 파라미터이며, 알고리즘에 의해 값은 변경됩니다. 블록생성 주기가 10~20초 사이가 되도록 맞춰집니다.
· alloc
초기에 state를 정의하는 부분입니다. 즉, 이더리움을 특정 지갑에 할당하거나 스마트 컨트랙트를 배포하는 용도입니다.
alloc은 coinbase와 다르게 prefix로 포함된 0x를 지워야 합니다.
우리가 앞에서 생성한 주소를 기반으로 만들어진 genesis 블록(genesis.json) 정보는 다음과 같습니다.
{
  "config": {
    "chainId": 10,
    "homesteadBlock": 0,
    "eip150Block": 0,
    "eip155Block": 0,
    "eip158Block": 0,
    "byzantiumBlock": 0,
    "constantinopleBlock": 0,
    "petersburgBlock": 0,
    "istanbulBlock": 0
  },
  "coinbase"   : "0x04dEb80cc89c42D8148312CFC16E1579E4aF7291",
  "nonce": "0x0000000000000033",
  "timestamp": "0x177AACF3671",
  "parentHash": "0x0000000000000000000000000000000000000000000000000000000000000000",
  "gasLimit": "0x8000000",
  "difficulty": "0x100",
  "mixhash": "0x0000000000000000000000000000000000000000000000000000000000000000",
  "alloc": {
    "04dEb80cc89c42D8148312CFC16E1579E4aF7291": {
        "balance": "500000000000000000000000"
    },
    "56F11a78100226558194655c0eAbf64F9627181D": {
        "balance": "800000000000000000000000"
     }
  }
}
· 제네시스 블록 초기화
제네시스 블록을 정의한 파일을 기반으로 제네시스 블록을 초기화 하기 위해 init 명령어를 사용합니다.
$ geth --datadir [경로] init [제네시스파일 경로]당연히 datadir을 전달해야 해당 경로에 초기블록 정보를 저장합니다.
$ geth --datadir $PWD init genesis.json

INFO [02-16|21:41:12.661] Maximum peer count                       ETH=50 LES=0 total=50
INFO [02-16|21:41:12.692] Set global gas cap                       cap=25000000
INFO [02-16|21:41:12.692] Allocated cache and file handles         database=/Users/bagjeongtae/Desktop/node1/geth/chaindata cache=16.00MiB handles=16
INFO [02-16|21:41:12.765] Writing custom genesis block
INFO [02-16|21:41:12.766] Persisted trie from memory database      nodes=3 size=411.00B time="205.117µs" gcnodes=0 gcsize=0.00B gctime=0s livenodes=1 livesize=0.00B
INFO [02-16|21:41:12.767] Successfully wrote genesis state         database=chaindata hash="2bd1fd…2ba123"
INFO [02-16|21:41:12.767] Allocated cache and file handles         database=/Users/bagjeongtae/Desktop/node1/geth/lightchaindata cache=16.00MiB handles=16
INFO [02-16|21:41:12.840] Writing custom genesis block
INFO [02-16|21:41:12.841] Persisted trie from memory database      nodes=3 size=411.00B time="142.937µs" gcnodes=0 gcsize=0.00B gctime=0s livenodes=1 livesize=0.00B
INFO [02-16|21:41:12.841] Successfully wrote genesis state         database=lightchaindata hash="2bd1fd…2ba123"
여기까지 작업을 정상적으로 마쳤다면 다음과 같이 결과를 얻습니다.
자 이제 첫번째 노드를 실행시킬 준비를 마쳤습니다.
· 노드실행
$ geth \
--datadir $PWD \
--syncmode 'full' \
--allow-insecure-unlock \
--networkid 10 \
--maxpeers 3 \
--http \
--http.port 8545 \
--http.addr "0.0.0.0" \
--http.corsdomain "*" \
--http.api "admin,eth,debug,miner,net,txpool,personal,web3" \
--ws \
--ws.port 3334 \
--ws.api eth,net,web3 \
--port 30303 \
--gasprice 21000 \
--nodiscover \
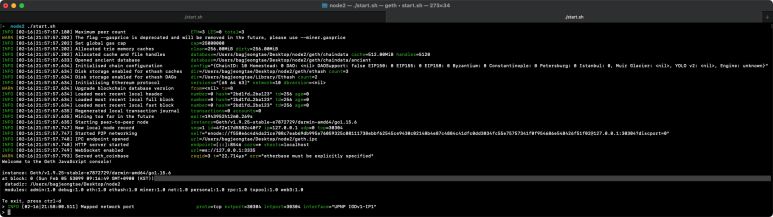
console실행 옵션이 상당히 많은데 옵션 설명은 일단 스킵하고 넘어가겠습니다. 앞의 명령어를 수행하면 다음과 같이 로그가 출력되면서 대기상태가 됩니다.
INFO [02-16|21:46:39.824] Maximum peer count                       ETH=3 LES=0 total=3
WARN [02-16|21:46:39.857] The flag --gasprice is deprecated and will be removed in the future, please use --miner.gasprice
INFO [02-16|21:46:39.857] Set global gas cap                       cap=25000000
INFO [02-16|21:46:39.857] Allocated trie memory caches             clean=256.00MiB dirty=256.00MiB
INFO [02-16|21:46:39.857] Allocated cache and file handles         database=/Users/bagjeongtae/Desktop/node1/geth/chaindata cache=512.00MiB handles=5120
INFO [02-16|21:46:40.144] Opened ancient database                  database=/Users/bagjeongtae/Desktop/node1/geth/chaindata/ancient
INFO [02-16|21:46:40.145] Initialised chain configuration          config="{ChainID: 10 Homestead: 0 DAO: <nil> DAOSupport: false EIP150: 0 EIP155: 0 EIP158: 0 Byzantium: 0 Constantinople: 0 Petersburg: 0 Istanbul: 0, Muir Glacier: <nil>, YOLO v2: <nil>, Engine: unknown}"
INFO [02-16|21:46:40.145] Disk storage enabled for ethash caches   dir=/Users/bagjeongtae/Desktop/node1/geth/ethash count=3
INFO [02-16|21:46:40.145] Disk storage enabled for ethash DAGs     dir=/Users/bagjeongtae/Library/Ethash count=2
INFO [02-16|21:46:40.145] Initialising Ethereum protocol           versions="[65 64 63]" network=10 dbversion=<nil>
WARN [02-16|21:46:40.145] Upgrade blockchain database version      from=<nil> to=8
INFO [02-16|21:46:40.147] Loaded most recent local header          number=0 hash="2bd1fd…2ba123" td=256 age=0
INFO [02-16|21:46:40.147] Loaded most recent local full block      number=0 hash="2bd1fd…2ba123" td=256 age=0
INFO [02-16|21:46:40.147] Loaded most recent local fast block      number=0 hash="2bd1fd…2ba123" td=256 age=0
INFO [02-16|21:46:40.147] Regenerated local transaction journal    transactions=0 accounts=0
INFO [02-16|21:46:40.148] Starting peer-to-peer node               instance=Geth/v1.9.25-stable-e7872729/darwin-amd64/go1.15.6
INFO [02-16|21:46:40.148] Mining too far in the future             wait=1943952h23m17.269s
INFO [02-16|21:46:40.276] New local node record                    seq=1 id=b3a7bc0f70f798d1 ip=127.0.0.1 udp=0 tcp=30303
INFO [02-16|21:46:40.277] Started P2P networking                   self="enode://3d161a305a562575f7ca7a3e99dc5254556fc126098e4128644fb580e3b83fd6fc5ad27ef721428d1473115442c7150da15c6f7a2ff08edd7623ca9dd0e192ba@127.0.0.1:30303?discport=0"
INFO [02-16|21:46:40.277] IPC endpoint opened                      url=/Users/bagjeongtae/Desktop/node1/geth.ipc
INFO [02-16|21:46:40.278] HTTP server started                      endpoint=[::]:8545 cors=* vhosts=localhost
INFO [02-16|21:46:40.278] WebSocket enabled                        url=ws://127.0.0.1:3334
INFO [02-16|21:46:40.329] Etherbase automatically configured       address=0x04dEb80cc89c42D8148312CFC16E1579E4aF7291
Welcome to the Geth JavaScript console!

instance: Geth/v1.9.25-stable-e7872729/darwin-amd64/go1.15.6
coinbase: 0x04deb80cc89c42d8148312cfc16e1579e4af7291
at block: 0 (Sun Feb 05 53099 09:16:49 GMT+0900 (KST))
 datadir: /Users/bagjeongtae/Desktop/node1
 modules: admin:1.0 debug:1.0 eth:1.0 ethash:1.0 miner:1.0 net:1.0 personal:1.0 rpc:1.0 txpool:1.0 web3:1.0

To exit, press ctrl-d

>
저는 start.sh 파일을 만들어 앞의 명령어를 실행했습니다.
다음 명령어를 통해 앞에서 생성한 keystore 파일을 확인할 수 있습니다.
> eth.accounts
["0x04deb80cc89c42d8148312cfc16e1579e4af7291", "0x56f11a78100226558194655c0eabf64f9627181d"]
3. 두 번째 노드 생성
여기서부터 상당히 중요합니다.
· genesis 블록 정의
제네시스 파일을 별도로 만들지 않고 앞에서 만든 제네시스 파일을 그대로 사용하여 초기화 작업을 진행해야 합니다. 또한 두 번째 노드 디렉터리에 keystore/가 없어도 됩니다.
일단 두 번째 노드가 데이터를 저장할 디렉터리를 새로 만들어 준 후 앞에서 만든 genesis.json을 그대로 복사합니다.

· 제네시스 블록 초기화
$ geth --datadir $PWD init genesis.json

INFO [02-16|21:53:34.096] Maximum peer count                       ETH=50 LES=0 total=50
INFO [02-16|21:53:34.119] Set global gas cap                       cap=25000000
INFO [02-16|21:53:34.119] Allocated cache and file handles         database=/Users/bagjeongtae/Desktop/node2/geth/chaindata cache=16.00MiB handles=16
INFO [02-16|21:53:34.240] Writing custom genesis block
INFO [02-16|21:53:34.241] Persisted trie from memory database      nodes=3 size=411.00B time="208.877µs" gcnodes=0 gcsize=0.00B gctime=0s livenodes=1 livesize=0.00B
INFO [02-16|21:53:34.242] Successfully wrote genesis state         database=chaindata hash="2bd1fd…2ba123"
INFO [02-16|21:53:34.242] Allocated cache and file handles         database=/Users/bagjeongtae/Desktop/node2/geth/lightchaindata cache=16.00MiB handles=16
INFO [02-16|21:53:34.317] Writing custom genesis block
INFO [02-16|21:53:34.317] Persisted trie from memory database      nodes=3 size=411.00B time="130.919µs" gcnodes=0 gcsize=0.00B gctime=0s livenodes=1 livesize=0.00B
INFO [02-16|21:53:34.318] Successfully wrote genesis state         database=lightchaindata hash="2bd1fd…2ba123"
첫 번째 노드에서 제네시스 블록을 생성할 때 사용한 명령어와 동일합니다. 다만 해당 명령어를 수행하는 위치가 다릅니다.

제네시스 블록으로 생성된 데이터의 위치가 다른것을 확인할 수 있습니다.
· 노드실행
노드 실행준비가 벌써 끝났습니다.
여기서 개념이 상당히 잡히지 않을 수 있는데 여기선 개념 설명은 깊게 다루지 않겠습니다.
$ geth \
--datadir $PWD \
--syncmode 'full' \
--allow-insecure-unlock \
--networkid 10 \
--maxpeers 3 \
--http \
--http.port 8546 \
--http.addr "0.0.0.0" \
--http.corsdomain "*" \
--http.api "admin,eth,debug,miner,net,txpool,personal,web3" \
--ws \
--ws.port 3335 \
--ws.api eth,net,web3 \
--port 30304 \
--gasprice 21000 \
--nodiscover \
console
두 번째 노드를 실행할 때 중요한 건 이미 실행중인 첫 번째 노드에서 사용중인 포트를 곂치지 않게 해야합니다. 다음 3개를 수정합니다.
--http.port
--ws.port
--port
INFO [02-16|21:57:57.180] Maximum peer count ETH=3 LES=0 total=3
WARN [02-16|21:57:57.202] The flag --gasprice is deprecated and will be removed in the future, please use --miner.gasprice
INFO [02-16|21:57:57.202] Set global gas cap cap=25000000
INFO [02-16|21:57:57.202] Allocated trie memory caches clean=256.00MiB dirty=256.00MiB
INFO [02-16|21:57:57.202] Allocated cache and file handles database=/Users/bagjeongtae/Desktop/node2/geth/chaindata cache=512.00MiB handles=5120
INFO [02-16|21:57:57.633] Opened ancient database database=/Users/bagjeongtae/Desktop/node2/geth/chaindata/ancient
INFO [02-16|21:57:57.634] Initialised chain configuration config="{ChainID: 10 Homestead: 0 DAO: <nil> DAOSupport: false EIP150: 0 EIP155: 0 EIP158: 0 Byzantium: 0 Constantinople: 0 Petersburg: 0 Istanbul: 0, Muir Glacier: <nil>, YOLO v2: <nil>, Engine: unknown}"
INFO [02-16|21:57:57.634] Disk storage enabled for ethash caches dir=/Users/bagjeongtae/Desktop/node2/geth/ethash count=3
INFO [02-16|21:57:57.634] Disk storage enabled for ethash DAGs dir=/Users/bagjeongtae/Library/Ethash count=2
INFO [02-16|21:57:57.634] Initialising Ethereum protocol versions="[65 64 63]" network=10 dbversion=<nil>
WARN [02-16|21:57:57.634] Upgrade blockchain database version from=<nil> to=8
INFO [02-16|21:57:57.634] Loaded most recent local header number=0 hash="2bd1fd…2ba123" td=256 age=0
INFO [02-16|21:57:57.634] Loaded most recent local full block number=0 hash="2bd1fd…2ba123" td=256 age=0
INFO [02-16|21:57:57.634] Loaded most recent local fast block number=0 hash="2bd1fd…2ba123" td=256 age=0
INFO [02-16|21:57:57.635] Regenerated local transaction journal transactions=0 accounts=0
INFO [02-16|21:57:57.635] Mining too far in the future wait=1943952h12m0.269s
INFO [02-16|21:57:57.635] Starting peer-to-peer node instance=Geth/v1.9.25-stable-e7872729/darwin-amd64/go1.15.6
INFO [02-16|21:57:57.747] New local node record seq=1 id=4f2e17d5582c40f7 ip=127.0.0.1 udp=0 tcp=30304
INFO [02-16|21:57:57.747] Started P2P networking self="enode://f550e6c4d4da21ce708c7eab69db995e76059325c08111738ebbf62545ce9430c02148b4e87c4884c41dfc0dd3034fc55e75757341f0f954686e548426f51f02@127.0.0.1:30304?discport=0"
INFO [02-16|21:57:57.748] IPC endpoint opened url=/Users/bagjeongtae/Desktop/node2/geth.ipc
INFO [02-16|21:57:57.748] HTTP server started endpoint=[::]:8546 cors=* vhosts=localhost
INFO [02-16|21:57:57.749] WebSocket enabled url=ws://127.0.0.1:3335
WARN [02-16|21:57:57.793] Served eth_coinbase reqid=3 t="22.714µs" err="etherbase must be explicitly specified"
Welcome to the Geth JavaScript console!
instance: Geth/v1.9.25-stable-e7872729/darwin-amd64/go1.15.6
at block: 0 (Sun Feb 05 53099 09:16:49 GMT+0900 (KST))
datadir: /Users/bagjeongtae/Desktop/node2
modules: admin:1.0 debug:1.0 eth:1.0 ethash:1.0 miner:1.0 net:1.0 personal:1.0 rpc:1.0 txpool:1.0 web3:1.0
To exit, press ctrl-d
> INFO [02-16|21:58:00.511] Mapped network port proto=tcp extport=30304 intport=30304 interface="UPNP IGDv1-IP1"
>
실행을 정상적으로 마쳤습니다.
여기까지 이더리움 싱글노드 구축을 완료입니다.
4. 노드 동작 & 노드연결
이제 우리가 만든 노드를 하나의 시스템으로 묶어주기 위해 연결해줘야 합니다.

현재의 상황은 앞의이미지와 같습니다. 두 번째 노드에선 account new를 수행하지 않았기 때문에 해당 노드가 관리하고 있는 keystore 파일은 존재하지 않습니다.
· 네트워크 연결
앞에서 만든 두 개의 노드를 연결하기 위해 빨간색, 파란색으로 표시한 두 번째 박스를 보면 enode가 보일것입니다. enode는 노드간 연결하기 위한 식별자로 사용합니다.
첫 번째 노드의 enode를 복사합니다.
enode://3d161a305a562575f7ca7a3e99dc5254556fc126098e4128644fb580e3b83fd6fc5ad27ef721428d1473115442c7150da15c6f7a2ff08edd7623ca9dd0e192ba@127.0.0.1:30303?discport=0두 번째 노드에서 첫 번째 노드의 enode로 연결 요청을 합니다.
> admin.addPeer('enode://3d161a305a562575f7ca7a3e99dc5254556fc126098e4128644fb580e3b83fd6fc5ad27ef721428d1473115442c7150da15c6f7a2ff08edd7623ca9dd0e192ba@127.0.0.1:30303?discport=0')
· 연결확인
다음 명령어를 통해 해당 노드가 연결된 피어를 확인할 수 있습니다.
> admin.peers
그냥 단순히 연결된 피어숫자 및 연결가능 상태를 확인하기 위해선 다음 명령어를 수행합니다.
> net
{
  listening: true,
  peerCount: 1,
  version: "10",
  getListening: function(callback),
  getPeerCount: function(callback),
  getVersion: function(callback)
}listening은 연결 가능상태를 알려줍니다. true는 연결가능 상태입니다.
peerCount는 해당 노드가 연결된 피어수 입니다.
version이 일치한 노드만 연결할 수 있습니다.
5. 동작 테스트
마지막으로 우리가 만든 네트워크의 노드들이 잘 동작하는지 테스트해야 합니다.
그런데 무엇을 테스트해야할까요?
1. 트랜잭션 생성/전파
2. 블록 생성/전파
3. 동일한 state를 가지고 있는지
· 트랜잭션 생성/전파
가장먼저 확인해 볼 것은 트랜잭션을 생성하고 전파하는 부분입니다. 트랜잭션이 생성되면 해당 트랜잭션이 블록에 포함되기 전의 상태를 pending 상태라고 합니다. 즉, pending 상태의 트랜잭션 전파가 잘 이루어 지는지까지 테스트해야 합니다.
geth의 경우 keystore 파일에 lock이 걸려있기 때문에 트랜잭션을 발생하기 전에 unlock해야 합니다. 해당 명령어는 unlock하고자 하는 keystore 파일이 있는 노드에서 진행해야 하기 때문에 node1에서 진행합니다.
>  personal.unlockAccount(eth.accounts[0])
Unlock account 0x04deb80cc89c42d8148312cfc16e1579e4af7291
Passphrase:
true
트랜잭션을 발생하는 명령어는 다음과 같습니다. (트랜잭션을 발생하는 방법은 여러가지 있습니다)
eth.sendTransaction({from: 발신자, to: 수신자, value: 금액(단위 wei)})> eth.sendTransaction({from: eth.accounts[0], to: eth.accounts[1], value: 123})
WARN [02-16|22:23:00.390] Caller gas above allowance, capping requested=125222772 cap=25000000
INFO [02-16|22:23:00.390] Submitted transaction fullhash=0x438f1f0bcba2bfafa76b6c80d5838648d3b79d6f2bfe7b0920393f061592fca7 recipient=0x2c08FF6B5cfaA09BBe87c2B16B0f3A234901917E
"0x438f1f0bcba2bfafa76b6c80d5838648d3b79d6f2bfe7b0920393f061592fca7"앞의 결과처럼 나온다면 트랜잭션이 정상적으로 발생된 것 입니다.
발생된 트랜잭션을 확인하기 위해 다음 명령어를 수행합니다.
eth.pendingTransactions
첫 번째 노드에서 발생한 트랜잭션이 두 번째 노드에 잘 전파된 모습을 확인할 수 있습니다.
여기서부터 앞에서 실수한 부분이 있어 주소값이 앞과 상이하게 표시될 수 있습니다.
(여기서 from, to가 앞에서 생성안 주소랑 달라지는데 글을 쓰면서 구동을 하다보니 실수해서 다시 처음부터 진행한 덕에 주소값이 다르게 표시됩니다)
· 블록생성 전파
블록생성의 경우 아무 노드에서나 다음 명령어를 수행하면 됩니다.
> miner.start()
> miner.stop()
저는 첫 번째 노드에서 블록을 생성했지만 두 번째 노드에서 블록생성을 시도하겠습니다. 그리고 앞에서 생성한 트랜잭션 해쉬값은 잘 가지고 있습니다. 추후에 블록에 잘 들어갔는지 확인하는 용도로 사용할 것 입니다.
0x438f1f0bcba2bfafa76b6c80d5838648d3b79d6f2bfe7b0920393f061592fca7아직 블록에 포함되지 않았기 때문에 blockHash와 blockNumber가 null이 저장되있습니다.
> eth.getTransaction('0x438f1f0bcba2bfafa76b6c80d5838648d3b79d6f2bfe7b0920393f061592fca7')
{
  blockHash: null,
  blockNumber: null,
  from: "0x598373c741d15d4c6b993288fe94e92231355d12",
  gas: 21000,
  gasPrice: 21000,
  hash: "0x438f1f0bcba2bfafa76b6c80d5838648d3b79d6f2bfe7b0920393f061592fca7",
  input: "0x",
  nonce: 8,
  r: "0x95664b35aa1cc1945564a57baa624f519c10d236b579aecc52df8a9503fa2946",
  s: "0x192aa1271dfcae8d44dcc3ba7ec50a7e8bc5139ebbc2e777002e2bc7eed4f2a",
  to: "0x2c08ff6b5cfaa09bbe87c2b16b0f3a234901917e",
  transactionIndex: null,
  v: "0x37",
  value: 123
}
저는 두 번째 노드인 아래 노드에서 POW 알고리즘을 동작했습니다. POW 결과에 따라 생성된 블록을 연결된 첫 번째 노드로 전파를 합니다. miner.stop()을 이용하여 마이닝을 멈춰줍니다.
> eth.blockNumber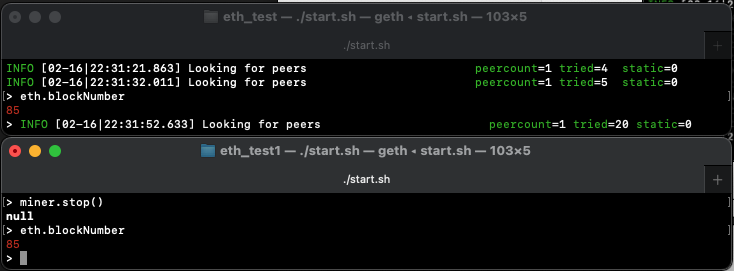
블록갯수 확인
> eth.getTransaction('0x438f1f0bcba2bfafa76b6c80d5838648d3b79d6f2bfe7b0920393f061592fca7')
{
  blockHash: "0x560ed0ae33404daeb8c23da288532fba46220a9f13c3c0380d4be2061887d09e",
  blockNumber: 71,
  from: "0x598373c741d15d4c6b993288fe94e92231355d12",
  gas: 21000,
  gasPrice: 21000,
  hash: "0x438f1f0bcba2bfafa76b6c80d5838648d3b79d6f2bfe7b0920393f061592fca7",
  input: "0x",
  nonce: 8,
  r: "0x95664b35aa1cc1945564a57baa624f519c10d236b579aecc52df8a9503fa2946",
  s: "0x192aa1271dfcae8d44dcc3ba7ec50a7e8bc5139ebbc2e777002e2bc7eed4f2a",
  to: "0x2c08ff6b5cfaa09bbe87c2b16b0f3a234901917e",
  transactionIndex: 0,
  v: "0x37",
  value: 123
}
> eth.pendingTransactions
[]
트랜잭션이 블록에 포함된 정보와 pending 상태의 트랜잭션이 비어져있는 모습을 확인할 수 있습니다.
· state 확인
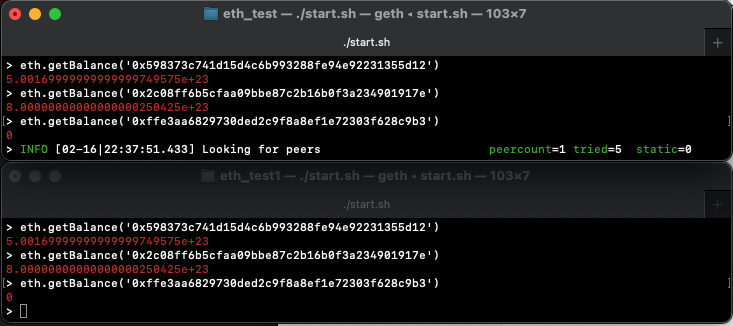
앞에서 블록, 트랜잭션 상태가 동일하게 공유된 모습을 확인했습니다. 하지만 가장 중요한 것은 주소마다 보유한 이더리움이 같은지 확인을 해야합니다. 첫 번째 노드에서 관리중인 keystore의 주소값을 조회하기 위해 eth.accounts를 이용합니다.
> eth.accounts
["0x598373c741d15d4c6b993288fe94e92231355d12", "0x2c08ff6b5cfaa09bbe87c2b16b0f3a234901917e", "0xffe3aa6829730ded2c9f8a8ef1e72303f628c9b3"]
이제 각각의 이더잔액을 조회하기 위해 eth.getBalance()를 이용합니다,
> eth.getBalance(주소)> eth.getBalance('0x598373c741d15d4c6b993288fe94e92231355d12')
> eth.getBalance('0x2c08ff6b5cfaa09bbe87c2b16b0f3a234901917e')
> eth.getBalance('0xffe3aa6829730ded2c9f8a8ef1e72303f628c9b3')첫 번째, 두 번째 노드에서 실행하여 잔액을 확인합니다.
여기서 Looking for peers는 노드를 실행할 때 --nodiscovery 옵션을 주지 않았기 때문에 주기적으로 연결할 노드를 탐색하고 있는 로그입니다.
이번 시간엔 private한 형태로 네트워크 구축하는 방법을 알아보았습니다.
다음 시간엔 여기서 다루지 않은 개념적인 내용과 우리가 만든 private 네트워크망에서 노드 모니터링을 연동해보도록 하겠습니다.
'블록체인' 카테고리의 다른 글
| [ethereum] 이더리움 네트워크 모니터링 시스템 구축 (0) | 2022.08.28 |
|---|---|
| [ethereum] Geth를 이용하여 Clique(POA) 기반 private network 구축하기 (0) | 2022.08.28 |
| [ethereum] mnemonic 생성, privatekey 복구와 계층적 구조의 원리 (0) | 2022.08.27 |
| [ethereum] privatekey를 이용하여 address 복구, transaction 발생 (0) | 2022.08.27 |
| [블록체인] 블록체인 시스템은 어떻게 구축할까 1편 - exchange, wallet, payment에서 transaction 취급방법 (0) | 2022.08.27 |


