| 일 | 월 | 화 | 수 | 목 | 금 | 토 |
|---|---|---|---|---|---|---|
| 1 | 2 | 3 | ||||
| 4 | 5 | 6 | 7 | 8 | 9 | 10 |
| 11 | 12 | 13 | 14 | 15 | 16 | 17 |
| 18 | 19 | 20 | 21 | 22 | 23 | 24 |
| 25 | 26 | 27 | 28 | 29 | 30 | 31 |
- Programming
- web3
- 네트워크
- tcp
- 트랜잭션
- MySQL
- solidity
- git
- erc
- 이더리움
- erc721
- truffle
- Ethereum
- github
- ethers
- Docker
- web
- 스마트 컨트랙트
- ERC20
- 솔리디티
- server
- blockchain
- Python
- JavaScript
- 블록체인
- 제어의역전
- web3.js
- ERC165
- geth
- NFT
- Today
- Total
멍개의 연구소
[ethereum] docker를 활용한 이더리움 네트워크 구축 - 3편 본문
[ethereum] docker를 활용한 이더리움 네트워크 구축 - 1편
docker를 활용하여 geth를 설치하고 이더리움 네트워크를 구축하는 방법에 대해서 알아보겠습니다. 오랜만에 도커를 다뤄서 그런지 하루종일 엄청난 삽질을 했네요 ㅠㅠ 도커를 사용하여 환경설
meongae.tistory.com
2022.08.27 - [블록체인] - [ethereum] docker를 활용한 이더리움 네트워크 구축 - 2편
우선 geth에서 노드들을 연결하기 위해서는 admin.addPeer을 이용하여 연결해야 합니다.
· geth에서 peer 연결하는 방법
> admin
{
  datadir: "/home/DATA_STORE",
  nodeInfo: {
    enode: "enode://8492fb09f050f07e6d57bff3f6454620b3954db28f118d3978268ba0d083c584979fa9fdb64e575ef49cd8a77a4ca9a895bb26fa63c844ce977afff9dc34943b@[::]:30305",
    id: "8492fb09f050f07e6d57bff3f6454620b3954db28f118d3978268ba0d083c584979fa9fdb64e575ef49cd8a77a4ca9a895bb26fa63c844ce977afff9dc34943b",
    ip: "::",
    listenAddr: "[::]:30305",
    name: "Geth/v1.5.5-stable-ff07d548/linux/go1.6.2",
    ports: {
      discovery: 30305,
      listener: 30305
    },
    protocols: {
      eth: {
        difficulty: 16384,
        genesis: "0x04d8be6fcee0e7706d1693b818d85b2f55352a917b2fc7a6806b33caa0e469b5",
        head: "0x04d8be6fcee0e7706d1693b818d85b2f55352a917b2fc7a6806b33caa0e469b5",
        network: 11223344
      }
    }
  },
  peers: [],
  addPeer: function(),
  exportChain: function(),
  getDatadir: function(callback),
  getNodeInfo: function(callback),
  getPeers: function(callback),
  importChain: function(),
  removePeer: function(),
  setSolc: function(),
  sleep: function github.com/ethereum/go-ethereum/console.(*bridge).Sleep-fm(),
  sleepBlocks: function github.com/ethereum/go-ethereum/console.(*bridge).SleepBlocks-fm(),
  startRPC: function(),
  startWS: function(),
  stopRPC: function(),
  stopWS: function()
}
이렇게 나오게 나옵니다. peer를 보면 아무것도 연결이 되지 않아있습니다.
> admin.nodeInfo.enode
"enode://8492fb09f050f07e6d57bff3f6454620b3954db28f118d3978268ba0d083c584979fa9fdb64e575ef49cd8a77a4ca9a895bb26fa63c844ce977afff9dc34943b@[::]:30305"
해당 값을 다른 노드에서 admin.addPeer()로 넣어주면 됩니다. 그런데 node가 추가될 때마다 넣어주기에는 매우 귀찮으므로 해당 작업을 자동해보겠습니다.
> admin
{
  datadir: "/home/DATA_STORE",
  nodeInfo: {
    enode: "enode://8492fb09f050f07e6d57bff3f6454620b3954db28f118d3978268ba0d083c584979fa9fdb64e575ef49cd8a77a4ca9a895bb26fa63c844ce977afff9dc34943b@[::]:30305",
    id: "8492fb09f050f07e6d57bff3f6454620b3954db28f118d3978268ba0d083c584979fa9fdb64e575ef49cd8a77a4ca9a895bb26fa63c844ce977afff9dc34943b",
    ip: "::",
    listenAddr: "[::]:30305",
    name: "Geth/v1.5.5-stable-ff07d548/linux/go1.6.2",
    ports: {
      discovery: 30305,
      listener: 30305
    },
    protocols: {
      eth: {
        difficulty: 16384,
        genesis: "0x04d8be6fcee0e7706d1693b818d85b2f55352a917b2fc7a6806b33caa0e469b5",
        head: "0x04d8be6fcee0e7706d1693b818d85b2f55352a917b2fc7a6806b33caa0e469b5",
        network: 11223344
      }
    }
  },
  peers: [{
      caps: ["eth/62", "eth/63"],
      id: "0d97e3cda49f9d56b22d60ca9e87dd25894e164f64b68c56ba2c3066abe50fbd10719c959b58233de63561ad41e46853ef4125aa841779d18857ebe2abf57a6c",
      name: "Geth/v1.5.5-stable-ff07d548/linux/go1.6.2",
      network: {
        localAddress: "172.21.0.3:30305",
        remoteAddress: "172.21.0.1:50594"
      },
      protocols: {
        eth: {...}
      }
  }, {
      caps: ["eth/62", "eth/63"],
      id: "4e1b1bb95c199f9d75392f3ec521bb34cb8b33392922a27803019d8e1da055567faaa024f1f04a0faf3b13ce4162cd42a3b1175ca04778b3fc9845ee56eea80a",
      name: "Geth/v1.5.5-stable-ff07d548/linux/go1.6.2",
      network: {
        localAddress: "172.21.0.3:30305",
        remoteAddress: "172.21.0.1:50574"
      },
      protocols: {
        eth: {...}
      }
  }, {
      caps: ["eth/62", "eth/63"],
      id: "e66b0065af8757fe2ddd5f8a9ddad716333d8e20b33a57fd328b8bd43089d465ba3c4495cb8fe5db706d4264f6615fc36d94b13504ade4d3040047cb073adba8",
      name: "Geth/v1.5.5-stable-ff07d548/linux/go1.6.2",
      network: {
        localAddress: "172.21.0.3:30305",
        remoteAddress: "172.21.0.1:50584"
      },
      protocols: {
        eth: {...}
      }
  }],
  addPeer: function(),
  exportChain: function(),
  getDatadir: function(callback),
  getNodeInfo: function(callback),
  getPeers: function(callback),
  importChain: function(),
  removePeer: function(),
  setSolc: function(),
  sleep: function github.com/ethereum/go-ethereum/console.(*bridge).Sleep-fm(),
  sleepBlocks: function github.com/ethereum/go-ethereum/console.(*bridge).SleepBlocks-fm(),
  startRPC: function(),
  startWS: function(),
  stopRPC: function(),
  stopWS: function()
}
addPeer을 하면 위와같이 peer 부분이 추가됩니다.
● docker-compose 분리
우선 기존의 docker-compose.yml을 2개로 분리합니다.
· docker-compose.main.yml
version: '2'

services:
    ether.node1.com:
        image: 'ethereum'
        tty: true
        ports:
            - 8545:8545
            - 30305:30305
        environment:
            ENV: ETHERNODE1
            RPCPORT: 8545
            PORT: 30305
        container_name: ether.node1.com
        command : geth --networkid 11223344 --maxpeers 30 --datadir /home/DATA_STORE --rpc --rpcport 8545 --rpcaddr "0.0.0.0" --rpccorsdomain "*" --rpcapi "admin,db,eth,debug,miner,net,shh,txpool,personal,web3" --port 30305
        working_dir: /home/DATA_STORE

    ether.node2.com:
        image: 'ethereum'
        tty: true
        ports:
            - 8546:8546
            - 30306:30306
        environment:
            ENV: ETHERNODE2
            RPCPORT: 8546
            PORT: 30306
        container_name: ether.node2.com
        command : geth --networkid 11223344 --maxpeers 30 --datadir /home/DATA_STORE --rpc --rpcport 8546 --rpcaddr "0.0.0.0" --rpccorsdomain "*" --rpcapi "admin,db,eth,debug,miner,net,shh,txpool,personal,web3" --port 30306
        working_dir: /home/DATA_STORE

    ether.node3.com:
        image: 'ethereum'
        tty: true
        ports:
            - 8547:8547
            - 30307:30307
        environment:
            ENV: ETHERNODE3
            RPCPORT: 8547
            PORT: 30307
        container_name: ether.node3.com
        command :  geth --networkid 11223344 --maxpeers 30 --datadir /home/DATA_STORE --rpc --rpcport 8547 --rpcaddr "0.0.0.0" --rpccorsdomain "*" --rpcapi "admin,db,eth,debug,miner,net,shh,txpool,personal,web3" --port 30307
        working_dir: /home/DATA_STORE
우선 docker-compose.main.yml은 기존의 docker-compose.yml과 같습니다. --maxpeers의 옵션값만 증가시켰습니다.이 부분은 원하는 만큼 조정하면 됩니다. 필자는 30으로 주었습니다.
$ docker-compose -f docker-compose.main.yml up-f 옵션을 이용하여 해당 파일을 생성합니다. docker-compose.yml은 docker-compose up으로 바로 실행가능 하지만 파일 이름이 바뀌었다면 -f 옵션을 이용하면 됩니다.

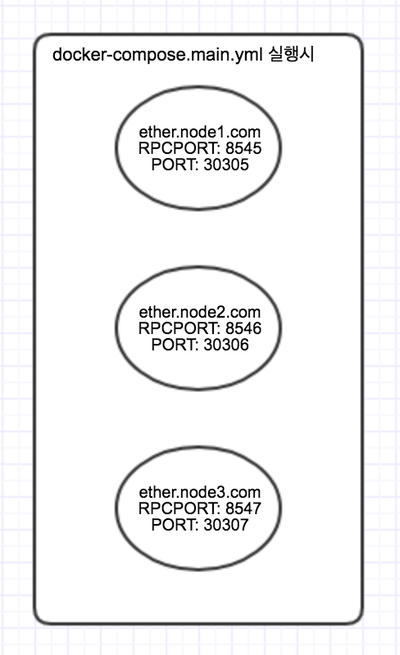
실행을 하게되면 3개의 노드 컨테이너를 생성합니다. RPCPORT와 PORT는 docker-compose.main.yml에 설정한대로 생성합니다.
원래 여기서 생성한 노드들끼리 연결을 하려고 했으나 너무 복잡해 질 것 같아서 sub 노드들을 생성하여 main 노드들을 연결하는 방식으로 만들었습니다.

터미널 창에는 해당 이미지 처럼 출력결과가 뜨게 되는데, admin.nodeInfo.enode 정보를 볼 수 있습니다.
static-nodes.json을 만들어 줍니다.
[
    "enode://8492fb09f050f07e6d57bff3f6454620b3954db28f118d3978268ba0d083c584979fa9fdb64e575ef49cd8a77a4ca9a895bb26fa63c844ce977afff9dc34943b@192.168.1.25:30305",
    "enode://beb2d308a6ed2187b40c9e542776bef859cef87ed66489de206fd7daef5e58a5481b9d3d99fb3353186417307cd20c9013f2bca1dfa214594f24e722d531522f@192.168.1.25:30306",
    "enode://96ad22b877d1869662df9fe60e2c55145ead07c72aae3c206c268352f03a86e5daaf101fa6792ed59f3faae456c2112faeb6bcadca00fe210783bc3ac6ad54f3@192.168.1.25:30307"
]
@[::]:30307부분을 해당 노드로 연결할 수 있는 ip를 넣어서 만들어 줍니다.
· docker-compose.sub.yml
이제 main.yml로 만든 노드들을 static-nodes.json을 이용하여 연결시켜보도록 합시다.
version: '2'

services:
    ether.sub.node1.com:
        image: 'ethereum'
        tty: true
        ports:
            - 9545:9545
            - 40305:40305
        environment:
            ENV: ETHERNODE1
            RPCPORT: 9545
            PORT: 40305
        container_name: ether.sub.node1.com
        volumes:
            - ./static-nodes.json:/home/DATA_STORE/geth/static-nodes.json
        command : geth --networkid 11223344 --maxpeers 30 --datadir /home/DATA_STORE --rpc --rpcport 9545 --rpcaddr "0.0.0.0" --rpccorsdomain "*" --rpcapi "admin,db,eth,debug,miner,net,shh,txpool,personal,web3" --port 40305
        working_dir: /home/DATA_STORE

    ether.sub.node2.com:
        image: 'ethereum'
        tty: true
        ports:
            - 9546:9546
            - 40306:40306
        environment:
            ENV: ETHERNODE2
            RPCPORT: 9546
            PORT: 40306
        container_name: ether.sub.node2.com
        volumes:
            - ./static-nodes.json:/home/DATA_STORE/geth/static-nodes.json
        command : geth --networkid 11223344 --maxpeers 30 --datadir /home/DATA_STORE --rpc --rpcport 9546 --rpcaddr "0.0.0.0" --rpccorsdomain "*" --rpcapi "admin,db,eth,debug,miner,net,shh,txpool,personal,web3" --port 40306
        working_dir: /home/DATA_STORE

    ether.sub.node3.com:
        image: 'ethereum'
        tty: true
        ports:
            - 9547:9547
            - 40307:40307
        environment:
            ENV: ETHERNODE3
            RPCPORT: 9547
            PORT: 40307
        container_name: ether.sub.node3.com
        volumes:
            - ./static-nodes.json:/home/DATA_STORE/geth/static-nodes.json
        command :  geth --networkid 11223344 --maxpeers 30 --datadir /home/DATA_STORE --rpc --rpcport 9547 --rpcaddr "0.0.0.0" --rpccorsdomain "*" --rpcapi "admin,db,eth,debug,miner,net,shh,txpool,personal,web3" --port 40307
        working_dir: /home/DATA_STORE
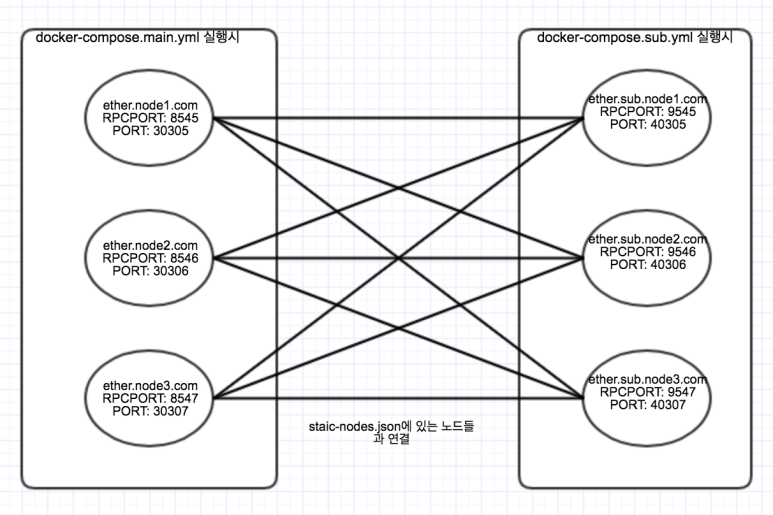
sub.yml에서는 volumes를 이용하여 host 디렉토리에 있는 static-nodes.json을 만들어질 컨테이너 {WORKING_DIR}/geth에서 static-nodes.json을 생성하여 공유합니다.
$ sudo docker-compose -f docker-compose.sub.yml up
노드들이 정상적으로 실행되었습니다.

실행된 결과를 도식화하면 해당 이미지와 같은 모습입니다. 우측 노들들이 생성되면 좌측의 main 노드정보가 저장된 static-nodes.json을 보고 자동으로 연결하는 구조입니다.

explorer를 실행시킨다면 현재는 main 노드에서 ether.node1.com만 연결을 해서 사용중이지만 main.yml로 생성된 노드들을 자동으로 스위칭하는 형태로 수정해보도록 하겠습니다. 저 부부은 중간에 LB를 이용하여 구현하면 될듯 합니다.
아직까지도 이더 계정을 생성한 후 miner를 동작시키는 부분은 없기 때문에 수동으로 해줘야 합니다.
https://blog.naver.com/pjt3591oo/221263718534
트랜잭셩이 발생하면 해당 글 처럼 동작되는 것을 확인할 수 있습니다.
계정생성 후 마이닝 돌리는 부분을 어떤 식으로 마이닝을 돌려야 할지 고민을 좀 더 해봐야 겠습니다.
https://github.com/pjt3591oo/multi-ethereum-network-system
'블록체인' 카테고리의 다른 글
| [ethereum] solidity에서 bytes32에서 string으로 변환 (0) | 2022.08.27 |
|---|---|
| [ethereum] node.js에서 web3.js를 이용하여 이더리움 네트워크 연결 (0) | 2022.08.27 |
| [ethereum] docker를 활용한 이더리움 네트워크 구축 - 2편 (0) | 2022.08.27 |
| [블록체인] 블록체인을 위한 고랭(golang) (0) | 2022.08.27 |
| [ethereum] docker를 활용한 이더리움 네트워크 구축 - 1편 (0) | 2022.08.27 |

