[네트워크] 분산된 환경에서의 호출을 위한 RPC, JSON-RPC, gRPC
이번 시간은 MSA(Micro Service Architecture)에서 많이 사용하는 프로토콜인 RPC에 대해서 다뤄보겠습니다.
혹시 HTTP를 제대로 이해하고 있지 않다면 다음글을 먼저 읽고 해당 강좌를 보는것을 권장합니다.
2022.08.28 - [컴퓨터 공학(Computer Science & Engineering))/네트워크] - [네트워크] TCP? HTTP? 그것이 알고싶다
[네트워크] TCP? HTTP? 그것이 알고싶다
TCP와 HTTP를 다뤄보도록 하겠습니다. 근데 사실 어렵지 않아요!!!! 이걸 어렵게 설명하니깐 어려운거지..... 어렵지 않은 이유를 알려드릴게요 사실 어려운 개념은 맞습니다. 왜냐고요? 우리 눈
meongae.tistory.com
● RPC란?
RPC는 Remote Procedure Call의 약자로 원격 프로시저(함수) 호출을 의미합니다. RPC는 프로세스간 통신을 위한 통신기법 입니다. RPC와 많이 비교하는 것 중 하나가 HTTP 기반의 REST 입니다.
RPC vs HTTP

Remote Procedure Call VS Hyper Text Transfer Protocol
HTTP의 주 목적은 문서의 교환입니다. 물론 지금은 문서보다 데이터를 주고받는 형태로 사용되고 있지만, 초기의 HTTP 목적은 HTML 문서를 주고받는 목적으로 설계되었습니다. 반면의 RPC는 무언가 연산을 수행하기 위한 목적으로 호출합니다.
HTTP 요청은 파일명이 a.html인 문서를 주세요
RPC는 a와 b의 값을 연산해주세요
HTTP는 method와 path로 구분하여 정의된 핸들러를 호출합니다.
RPC는 프로시저(함수)를 직접호출합니다. 호출하는 코드를 보면 이 정의 부분이 로컬에 있는지 원격에 있는지 구분이 안됩니다. 마치 로컬환경에 정의된 느낌을 받습니다. 이 부분이 RPC의 핵심입니다. RPC의 목적은 프로시저(함수)가 로컬에 있던 원격에 있던 신경쓰지 않습니다. 그리고 프로시저(함수)를 호출하기 때문에 호출하는 대상의 인터페이스가 매우 중요합니다. RPC에서 인터페이스는 매우 중요합니다. 우리가 calculator 함수를 호출할 때 함수 이름과 전달할 파라미터, 응답 데이터의 포맷을 알아야 정상적인 코딩이 가능해지는 것처럼 RPC도 이런 인터페이스가 매우 중요합니다. 오늘날의 RPC는 매우 발전된 형태로써 인터페이스 정의를 JSON과 proto buffer 형태로 정의하여 사용합니다.
{
  "jsonrpc": "2.0",
  "method": "test",
  "params": [1,2],
  "id": null
}
syntax = "proto3";
package com.terry.proto;
message Person{
string name = 1;
int32 age=2;
string email=3;
}MSA에서 HTTP보다 RPC를 사용 하는 이유가 분산된 환경에서 정의된 서비스들을 마치 로컬에서 호출하는것처럼 사용할 수 있기 때문입니다. 그리고 JSON-RPC나 gRPC의 경우 인터페이스를 정의하기 때문에 해당 인터페이스만 가지고 있다면 호출하기가 편리하다는 장점을 가집니다. 물론 gRPC의 경우 HTTP/2.0을 사용하기 때문에 기존의 HTTP/1.1보다 더 많은 장점을 가지고 있기도 합니다. JSON-RPC는 말이 RPC이지 HTTP 통신과 큰 차이를 느끼긴 힘듭니다.
오늘날의 HTTP는 다양한 프로토콜의 기반이 되는 프로토콜이 되어가고 있습니다. 지난 시간에 배웠던 웹소켓, socket.io들도 HTTP 위에서 동작하는 프로토콜이며, 오늘 다룰 JSON-RPC와 gRPC도 HTTP 위에서 동작하는 프로토콜 입니다. JSON-RPC는 HTTP/1.1에서 동작하며 gRPC는 HTTP/2.0에서 동작합니다.
HTTP는 단순히 문서를 주고받는 규약이 아니라 프로세스간 통신을 위해 데이터를 주고받는 프로토콜로써 자리를 잡고 있습니다. HTTP를 이용하여 두 프로세스를 연결시킨 후 우리가 정의한 프로토콜을 기반으로 새롭게 동작을 정의합니다. 대표적으로 웹소켓은 HTTP 헤더의 Connection을 Upgrade로 정의함으로써 HTTP로 커넥션을 요청한 후 websocket 프로토콜로 업그레이드 하여 통신을 합니다.
RPC는 HTTP보다 먼저 나온 개념입니다. HTTP는 1995년에 0.9, 1996년에 1.0이 발표되었으며 1999년에 1.1이 발표되었습니다. 하지만 RPC는 1980년도에 등장하기 시작했습니다. RPC는 TCP/IP를 기반으로 통신을 하지만 IPC를 위해 Named Pipe를 이용하기도 합니다. Named Pipe는 프로세스간 통신하는 기법입니다.
· 함수와 프로시저
앞에서 함수와 프로시저라는 용어가 나왔습니다. 이후에도 함수와 프로시저 용어는 계속 쓰입니다. 이 둘은 호출해서 무언가를 실행한다는 공통점을 가집니다. 하지만 어떤 관점의 실행이냐에 따라 함수 또는 프로시저로 나뉩니다.
함수는 인풋값에 대해서 아웃풋 값이 발생하는 것을 의미합니다. 즉 리턴이 존재합니다.
프로시저는 행위에 집중 합니다. 예를들어 A를 수행하고 B를 수행하고 C를 수행하는 일련의 과정을 프로시저로 정의할 수 있습니다.
함수와 프로시저는 데이터베이스에서도 사용합니다. 데이터베이스의 함수와 프로시저에서도 함수는 반환값을 주지만 프로시저는 반환값을 정의할 수 없도록 되어있습니다. 프로시저에서 반환값이 필요할 땐 커서 객체를 넘겨서 처리합니다.(저도 함수랑 프로시저랑 별 차이점 없이 혼용에서 썼었는데 회사에서 DBA 하시는 분이 알려줬음 ㅋ)
· 아키텍처
RPC의 전체적인 모습은 다음과 같습니다.
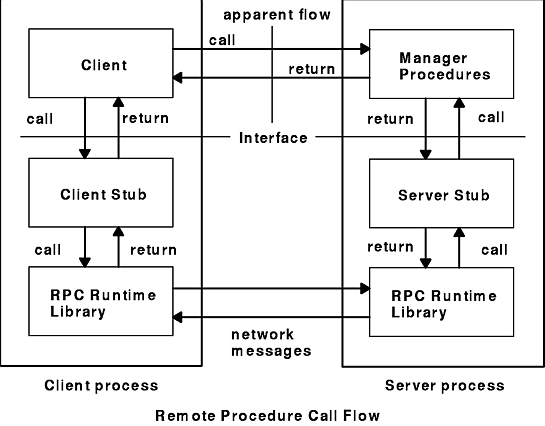
RPC는 정의된 인터페이스에 따라 호출을 하면 Stub을 만든 후 통신 가능한 형태로 변환하여 통신을 시도합니다. 그리고 통신 결과를 호출자에게 전달해줍니다. 클라이언트와 서버 사이의 통신은 TCP를 이용하겠죠? TCP를 이용한다는 것은 포트를 이용한다는 의미입니다. JSON-RPC와 gRPC는 Network message를 TCP를 이용한 HTTP로 주고받습니다. RPC는 OSI계층에서 전송계층과 응용계층을 연결하는 역할을 합니다.
정리하면 RPC는 인터페이스에 맞춰서 호출을 하면 원격 프로시저 또는 로컬 프로시저가 위치하는 곳으로 호출합니다. 이때 HTTP를 이용하여 호출 대상이 존재하는 목적지 프로세스까지 전달합니다. 호출 대상은 호출한 프로시저 함수를 실행한 후 결과를 돌려줍니다. RPC를 위해 HTTP를 사용한다는 것은 HTTP로도 RPC 호출을 할 수 있다는 것을 의미합니다. RPC 코드를 구현해보면 HTTP 위에 RPC를 추가하여 사용하게 됩니다.
● RPC 구현
nodejs에선 rpc 라이브러리를 이용하여 RPC 서버를 구성하고 클라이언트를 만들 수 있습니다.
· 의존성 라이브러리 설치
$ npm install --save connect rpcconnect는 express와 유사한 HTTP 서버 경량 프레임워크입니다.
· 서버 구현
const app = require('connect')();
const path = require('path');
const RPC = require('rpc');

const url_path = '/api';
const api_path = path.join(__dirname, './rpc-handler');

const rpcServer = RPC(
  url_path,
  api_path,
  { cors: true }
)

app.use(rpcServer);

app.listen(5000)
url_path로 엔드포인트 정의를 합니다. rpc 라이브러리는 런타임 엔진이며 실행할 코드를 rpc-handler.js로 정의합니다.
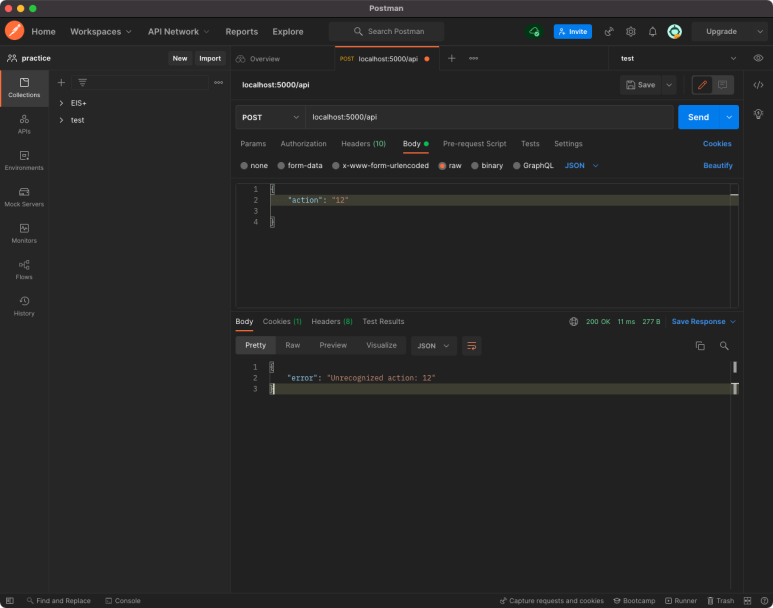
module.exports = function( input, okay, fail ) {
  console.log(input)
	let action = input.action
	if( action == "ping" ) {
		okay( "pong" );
	} else {
		fail( "Unrecognized action: " + action );
	}
}
RPC 핸들러는 3개의 인자를 전달받습니다. 첫 번째 인자는 HTTP 요청시 body 데이터를 받으며 okay와 fail은 해당 RPC 요청의 성공응답과 실패응답을 담당하는 함수입니다.
· 클라이언트
RPC 서버를 구축했지만 앞에서도 언급했지만 HTTP 위에서 구현되어 있기 때문에 HTTP 요청을 보내도 됩니다.

서버에서 action이 ping일 경우 okay를 호출합니다. 만약 action: ping이 아닌 값을 요청하면 fail을 호출합니다.
하지만 이렇게 구현을 하게되면 RPC를 만든 의미가 없습니다.
· RPC 서버구현
앞에서 RPC를 구현하기 위해선 인터페이스 정의를 한다고 했습니다. 타입스크립트의 힘을 빌리면 언어수준에서 인터페이스 정의를 맡길 수 있습니다.
$ npm install --save @node-rpc express @types/express @types/node @ co-body axiosimport { createServer, RPCFunctions } from "@node-rpc/server";
import { jsonDeserializer } from "@node-rpc/server/dist/deserializers/jsonDeserializer";
import { IncomingMessage, ServerResponse } from "http";
import express from 'express'
export interface IApi {
add: (a: number, b: number) => number;
subtract: (a: number, b: number) => number;
toLocaleString: (num: number) => string;
}
interface IContext {
lang: string;
}
const api: RPCFunctions<IApi, IContext> = {
add: (a, b) => () => a + b,
subtract: (a, b) => () => a - b,
toLocaleString: num => context => num.toLocaleString(context.lang),
};
const rpcServer = createServer({
    api,
    deserializer: jsonDeserializer,
});
async function main (req: IncomingMessage, res: ServerResponse) {
    const lang = req.headers["accept-language"]?.split(",")?.[0] || "en";

    const result = await rpcServer.handleAPIRequest(req, { lang });
    console.log(result);

    res.end(JSON.stringify(result));
};

const app = express()

app.post('/rpc', main)
app.listen(5000);엔드포인트가 /json으로 들어올 때 RPC 런타임을 동작시킵니다.
다음 코드가 RPC 런타임을 생성하는 부분입니다.
const rpcServer = createServer({
api,
deserializer: jsonDeserializer,
});다음 코드가 RPC 런타임을 HTTP 위에 바인딩 시키는 작업입니다. 바인딩 되는 path는 /rpc 입니다.
async function main (req: IncomingMessage, res: ServerResponse) {
const lang = req.headers["accept-language"]?.split(",")?.[0] || "en";
const result = await rpcServer.handleAPIRequest(req, { lang });
console.log(result);
res.end(JSON.stringify(result));
};
const app = express()
app.post('/rpc', main)· RPC 클라이언트 구현
import { createFallbackClient } from "@node-rpc/client";
import { jsonSerializer } from "@node-rpc/client/dist/serializers/jsonSerializer";
import { axiosXHR } from "@node-rpc/client/dist/xhr/axios";

interface IApi {
  add: (a: number, b: number) => number;
  subtract: (a: number, b: number) => number;
  toLocaleString: (num: number) => string;
}

const api = createFallbackClient<IApi>({
    endpoint: "http://localhost:5000/rpc",
    serializer: jsonSerializer,
    xhr: axiosXHR,
});

async function main() {
  const response = await api.createRequest('subtract', 11, 4).call();

  switch (response.type) {
      case "fail": {
          console.log("error", response.code, response.error);
          break;
      }
      case "noResponse": {
          console.log("no response");
          break;
      }
      case "success": {
          console.log("success", response.code, response.data);
          break;
      }
  }
}

main()
다음 코드가 RPC 런타임을 만드는 부분입니다.
const api = createFallbackClient<IApi>({
    endpoint: "http://localhost:5000/rpc",
    serializer: jsonSerializer,
    xhr: axiosXHR,
});
xhr은 데이터 통신 시 사용할 라이브러리를 의미합니다.
자 이제 HTTP 프로토콜을 어떻게 활용하여 데이터를 주고 받는지 알아보겠습니다.
· TCP 서버로 요청
const net = require('net');

const server = net.createServer(socket => {
  console.log(`cnnected address: ${socket.address().address}`);
  socket.on('data', (data) => {
    console.log('====== receive data=======');
    console.log(data.toString());
    socket.write('test')
    console.log('====== receive data=======');
  });
})

server.listen(5000, function() {
  console.log(`listen on port 5000`)
})
해당 서버로 앞에서 구현한 RPC 클라이언트가 요청을 해보겠습니다.
const response = await api.createRequest('subtract', 11, 4).call();POST /rpc HTTP/1.1
Accept: application/json, text/plain, */*
Content-Type: application/json
Authorization:
X-RPC-Procedure: subtract
User-Agent: axios/0.25.0
Content-Length: 6
Host: localhost:5000
Connection: close
[11,4]프로시저(함수) 이름은 X-RPC-procedure로 포함합니다. 프로시저로 전달될 파라미터는 body 영역에 포함합니다.
· TCP 클라이언트로 응답
이번엔 반대로 앞에서 구현한 RPC 서버를 실행한 후 TCP에서 직접 해당 서버로 요청을 보내보겠습니다.
const net = require('net');

// 서버 5000번 포트로 접속
// 3 way-handshake
const socket = net.connect({ port: 5000 });

socket.on('connect', function () {
  console.log('connected to server!');
  const msg = [
    'POST /rpc HTTP/1.1',
    'Accept: application/json, text/plain, */*',
    'Content-Type: application/json',
    'Authorization: ',
    'X-RPC-Procedure: subtract',
    'User-Agent: axios/0.25.0',
    'Content-Length: 6',
    'Host: localhost:5000',
    'Connection: close',
    '',
    '[11,4]',
  ].join('\r\n')
  socket.write(msg);
});

// 서버로부터 받은 데이터를 화면에 출력
socket.on('data', function (chunk) {
  console.log('response')
  console.log(chunk.toString());
});
클라이언트를 실행하면 응답 결과를 확인할 수 있습니다.
connected to server!
response
HTTP/1.1 200 OK
X-Powered-By: Express
Date: Sat, 29 Jan 2022 01:39:45 GMT
Connection: close
Content-Length: 1

7
● JSON-RPC
rpc를 통해 원격에 존재하는 프로시저(함수)를 호출할 수 있습니다. 하지만 한가지 문제가 있습니다. javascript처럼 자체적으로 인터페이스를 제공하지 않는 언어라면? 인터페이스 정의를 할 수 없습니다. 그래서 JSON-RPC가 등장합니다.
앞의 아키텍처 이미지에서 Interface가 명시되어 있습니다. Interface를 IDL이라고 부릅니다. IDL은 Interface Definition Laguage의 약자이며 인터페이스 정의 언어라는 뜻 입니다. JSON-RPC는 IDL로 JSON을 사용합니다. 여기서 인터페이스란 요청을 위한 정해진 폼을 의미하며 JSON-RPC는 요청시 규격화된 JSON 포맷을 이용합니다. 해당 포맷은 jsonrpc 버전, 호출 메서드 이름, 메서드 파라미터, id를 가집니다.
{"jsonrpc": "2.0", "method": "test", "params": [1,2], "id": null},· JSON-RPC 서버구축
nodejs에선 JSON-RPC를 위해 node-json-rpc를 제공합니다.
$ npm install --save node-json-rpcconst rpc = require('node-json-rpc');
const options = {
port: 5000,
host: '127.0.0.1',
path: '/',
strict: false
};
const serv = new rpc.Server(options);
serv.addMethod('test', function (params, callback) {
let error, result;
console.log(params)
if (params.length === 2) {
result = params[0] + params[1];
} else if (params.length > 2) {
result = params.reduce( (acc, val) => acc + val, 0);
} else {
error = { code: -32602, message: "Invalid params" };
}
callback(error, result);
});
serv.start(function (error) {
if (error) throw error;
else console.log('Server running ...');
});JSON-RPC는 요청 시 프로시저 이름, 파라미터의 위치가 정의되어 있기 때문에 어플리케이션 단에서 프로시저 이름이 있는지 없는지 검사하지 않아도 됩니다.
module.exports = function( input, okay, fail ) {
  console.log(input)
	let action = input.action
	if( action == "ping" ) {
		okay( "pong" );
	} else {
		fail( "Unrecognized action: " + action );
	}
}
· json-rpc 클라이언트
const rpc = require('node-json-rpc');

const options = {
  port: 5000,
  host: '127.0.0.1',
  path: '/',
  strict: false
};

const client = new rpc.Client(options);

client.call(
  {"jsonrpc": "2.0", "method": "test", "params": [1,2], "id": null},
  (err, res) => {
    if (err) { console.log(err); }
    else { console.log(res); }
  }
);

client.call(
  {"method": "myMethod", "params": [1,2], "id": 2},
  (err, res) => {
    if (err) { console.log(err); }
    else { console.log(res); }
  }
);
클라이언트는 정해진 JSON 포맷에 맞추어 요청하면 됩니다.
이또한 마찬가지로 HTTP 위에서 동작하기 때문에 HTTP 요청으로도 정상적으로 동작합니다.

http 요청 도구인 curl을이용하여 요청도 가능합니다.
$ curl -d '{"jsonrpc": "2.0", "method": "test", "params": [1,2], "id": null}' 127.0.0.1:5080· 요청/응답 패킷
TCP 서버와 클라이언트를 이용하여 HTTP 프로토콜을 어떻게 활용하는지 살펴보면 다음과 같습니다.
▶ 요청 패킷
const net = require('net');

const server = net.createServer(socket => {
  console.log(`cnnected address: ${socket.address().address}`);
  socket.on('data', (data) => {
    console.log('====== receive data=======');
    console.log(data.toString());
    socket.write('test')
    console.log('====== receive data=======');
  });
})

server.listen(5000, function() {
  console.log(`listen on port 5000`)
})
TCP 서버를 실행한 후 앞에서 구현한 JSON-RPC client를 실행합니다.
POST / HTTP/1.1
host: 127.0.0.1:5000
content-type: application/json
content-length: 58
Connection: close

{"jsonrpc":"2.0","method":"test","params":[1,2],"id":null}
▶ 응답 패킷
const net = require('net');

// 서버 5000번 포트로 접속
// 3 way-handshake
const socket = net.connect({ port: 5000 });

socket.on('connect', function () {
  console.log('connected to server!');
  const msg = [
    'POST / HTTP/1.1',
    'host: 127.0.0.1:5000',
    'content-type: application/json',
    'content-length: 58',
    'Connection: close',
    '',
    '{"jsonrpc":"2.0","method":"test","params":[1,2],"id":null}',
  ].join('\r\n')
  socket.write(msg);
});

// 서버로부터 받은 데이터를 화면에 출력
socket.on('data', function (chunk) {
  console.log('response')
  console.log(chunk.toString());
});
JSON-RPC 서버를 실행한 후 TCP 클라이언트를 실행합니다.
HTTP/1.1 200 OK
Date: Sat, 29 Jan 2022 02:01:02 GMT
Connection: close
Content-Length: 12

{"result":3}
jayson을 이용하여도 JSON-RPC 구현이 가능합니다.
jayson
JSON-RPC 1.0/2.0 compliant server and client. Latest version: 4.0.0, last published: 16 days ago. Start using jayson in your project by running `npm i jayson`. There are 329 other projects in the npm registry using jayson.
www.npmjs.com
● gRPC
gRPC는 IDL을 프로토 버퍼를 사용합니다.
syntax = "proto3";

package helloworld;

service Greeter {
  rpc SayHello (HelloRequest) returns (HelloReply) {};
}

message HelloRequest {
  required string name = 1;
}

message HelloReply {
  optional string message = 1;
}
그리고 HTTP/2.0을 사용합니다. gRPC는 RPC의 프레임워크라고 소개됩니다.

· gRPC 서버 구현
$ npm install --save @grpc/grpc-js @grpc/proto-loaderconst grpc = require('@grpc/grpc-js');
const protoLoader = require('@grpc/proto-loader');
// Suggested options for similarity to existing grpc.load behavior
const packageDefinition = protoLoader.loadSync(
    './helloworld.proto',
    {keepCase: true,
     longs: String,
     enums: String,
     defaults: true,
     oneofs: true
    });
const protoDescriptor = grpc.loadPackageDefinition(packageDefinition);
// The protoDescriptor object has the full package hierarchy
const routes = protoDescriptor.helloworld;
function sayHello(call, callback) {
console.log(call.request)
callback(null, {message: 'Hello ' + call.request.name});
}
function main(port = '5000') {
const server = new grpc.Server();
server.addService(
routes.Greeter.service, {
sayHello
}
);
server.bindAsync(`0.0.0.0:${port}`, grpc.ServerCredentials.createInsecure(), () => {
server.start();
});
}
module.exports = main;gRPC는 정의된 proto 파일 경로를 명시해야 합니다. gRPC는 런타임은 proto 파일을 기반으로 gRPC 런타임을 동작합니다.
const packageDefinition = protoLoader.loadSync(
'./helloworld.proto',
{keepCase: true,
longs: String,
enums: String,
defaults: true,
oneofs: true
});helloworld.proto는 다음과 같이 정의합니다.
syntax = "proto3";

package helloworld;

service Greeter {
  rpc SayHello (HelloRequest) returns (HelloReply) {};
}

message HelloRequest {
  required string name = 1;
}

message HelloReply {
  optional string message = 1;
}
· gRPC 클라이언트 구현
const path = require('path');
const grpc = require('@grpc/grpc-js');
const protoLoader = require('@grpc/proto-loader');

// Suggested options for similarity to existing grpc.load behavior
const packageDefinition = protoLoader.loadSync(
    path.join(__dirname, './helloworld.proto'),
    {keepCase: true,
     longs: String,
     enums: String,
     defaults: true,
     oneofs: true
    });
const protoDescriptor = grpc.loadPackageDefinition(packageDefinition);
// The protoDescriptor object has the full package hierarchy
const routes = protoDescriptor.helloworld;

function main() {
  var client = new routes.Greeter('localhost:5000',
                                       grpc.credentials.createInsecure());
  client.sayHello({name: 'you'}, function(err, response) {
    console.log('Greeting:', response.message);
  });
}

main()
클라이언트도 마찬가지로 정의된 proto를 기반으로 gRPC 런타임을 구성합니다.
· 요청패킷
역시나 TCP를 이용하여 요청/응답 패킷이 어떻게 되는지 확인해보도록 하겠습니다.
▶ 요청패킷
const net = require('net');

const server = net.createServer(socket => {
  console.log(`cnnected address: ${socket.address().address}`);
  socket.on('data', (data) => {
    console.log('====== receive data start=======');
    console.log(data.toString());
    socket.write('test')
    console.log('====== receive data end=======');
  });
})

server.listen(5000, function() {
  console.log(`listen on port 5000`)
})
TCP 서버를 구성 후 gRPC 클라이언트를 실행합니다.
====== receive data start=======
PRI * HTTP/2.0

SM

u��br�A��$_�*Kc�h���A����       ��@���Ȱ�B֕�Q!���4��&O��
                                                      -I~��j�P�4��&O�z��&=LMed@te�M�5�b

you
====== receive data end=======
====== receive data start=======
PRI * HTTP/2.0

SM


====== receive data end=======
지난시간에 HTTP/2.0은 하나의 요청인 스트림을 여러 메시지로 분해하여 전송한다고 했습니다. 또한 HTTP/2.0은 암호화(SSL, TSL) 되어 통신을 합니다. TCP 수준에서는 암호화 된 내용을 풀 수 없습니다. 왜냐하면 TCP의 상위레이어에서 암호화를 진행하기 때문에 상위 레이어에서 암호화를 해독할 수 있습니다. 만약 해당 수준에서 암호화가 가능하면 보안상 엄청난 이슈가 발생하게 됩니다.
HTTP/2.0이 HOLB를 해결하기 위해 하나의 요청 스트림을 여러 메시지로 쪼개어 전송된다는 사실을 확인했습니다.
지금까지 TCP부터 HTTP, WebSocket, Socket.io, RPC(RPC, JSON-RPC, gRPC)까지 긴 여정을 오시느라 고생 많으셨습니다. 이 프로토콜은 현재 서비스를 개발할 때 항상 사용하는 프로토콜입니다. 물론 다른 프로토콜들도 있겠지만 4종류의 프로토콜만 잘 이해하고 있다면 다른 프로토콜을 큰 어려움 없이 개발하거나 이해할 수 있을겁니다.
다음번 강의는 TCP의 핸드쉐이크 강의로 찾아뵙겠습니다.
아 그리고 간혹 블로그 쓸 때 어떤식으로 쓰는지 궁금해하시는 분이 있어서 블로그 쓰기전에 어떤 절차로 쓰는지 간략히 소개를 하면...
간략하게 정리할 내용을 아주 간략하게만 작성합니다. 개념같은 것들은 구글링 하여 한 3페이정도까지 읽어 본다음에 혹시나 잘못 알고있는 정보나 개념은 없는지 살펴보고 작성을 합니다. 보통 포스팅 시간은 2~3시간정도 걸리는데 이번글은 4시간 정도 걸린것 같습니다 ㅋㅋ